Identify your home’s flood risks and weak points with this DIY guide. We’ll walk you through the expert-level, actionable steps of a home flood risk assessment to evaluate your property’s vulnerability and strengthen its resilience against potential flooding.
Identify flood risks and weak points in your home using this step-by-step DIY flood risk assessment guide. Learn how to score vulnerabilities, mitigate damage, and reduce insurance costs.
Table of Contents
The Crucial Need for a Home Flood Risk Assessment
Flooding is not merely a coastal or riverine concern. Indeed, it stands as the most frequent and costliest natural disaster in the U.S., with average annual losses exceeding an astonishing $8 billion according to the Federal Emergency Management Agency (FEMA). The threat isn’t confined to designated high-risk flood zones anymore; localized heavy rainfall events, overwhelmed storm drains, and insufficient property drainage are leading to increasingly common and devastating “urban flooding” or “nuisance flooding” in areas previously considered safe.
Many homeowners overlook subtle vulnerabilities until it’s too late. A structured, proactive home flood risk assessment provides crucial insights into these often-missed weaknesses, empowering you to protect your most significant investment.
This comprehensive DIY audit is designed to help you meticulously identify:
- Your foundation’s precise elevation relative to potential flood levels, including the Base Flood Elevation (BFE) set by FEMA.
- Specific entry points like low door thresholds, window wells, foundation cracks, and utility penetrations that are prone to water seepage or direct ingress.
- The exact location and elevation of critical electrical and HVAC systems, water heaters, and irreplaceable belongings that may be positioned below potential flood grades, making them highly susceptible to costly damage.
Performing a thorough home flood risk assessment supports not just early risk detection, but also enables strategic, cost-effective mitigation planning. Furthermore, it provides essential, documented evidence that can potentially help you negotiate better terms on your flood insurance premiums or even apply for mitigation grants.
External Reference: FEMA Flood Map Service Center – Your primary resource for official flood zone information.
Step 1: Preparation for Your Home Flood Risk Assessment
Before you even step outside or begin a physical inspection, the initial phase involves gathering critical data. This foundational step establishes your baseline risk by combining official records with crucial on-the-ground information. Understanding your property’s historical context and official flood designation is paramount.
Understanding Your Baseline Risk
- Official Flood Insurance Rate Maps (FIRMs): These maps, provided by FEMA, delineate flood hazard zones, including Special Flood Hazard Areas (SFHAs), and often indicate the Base Flood Elevation (BFE) – the elevation to which floodwater is anticipated to rise during a 100-year flood event. Understanding your precise flood zone (e.g., A, AE, X) is the first critical piece of data.
- National Flood Hazard Layer (NFHL): A GIS dataset that displays flood hazard information, often integrated into online map viewers, providing more granular detail than static FIRMs.
- Local Flood Records: Your county or municipal planning office, emergency management agency, or public works department may maintain records of past flood events, drainage issues in your neighborhood, or local flood mitigation projects.
- Anecdotal Evidence: Don’t underestimate the value of speaking with long-time residents in your area. They can offer invaluable insights into historical flooding patterns, localized pooling issues, or specific drainage problems that official records might not fully capture. Look for informal community groups or online forums discussing local flooding.
Essential Tools for Your Audit
To conduct an accurate and thorough assessment, assemble the following tools:
- Tape Measure and Level: For measuring foundation heights, door/window sill elevations, and slopes. A longer tape measure (e.g., 25-50 feet) is useful for measuring perimeter slopes. A laser level can provide more precise elevation readings for larger areas.
- Smartphone with Elevation App: Apps like “My Altitude” (iOS) or “Altimeter GPS” (Android) can provide rough elevation readings. For more precision, consider apps that leverage topographic maps.
- Camera for Documentation: Your smartphone camera is excellent. Take clear, well-lit photos and short videos of all assessed areas, vulnerabilities, and healthy conditions for comparison. Timestamped photos are ideal.
- Audit Spreadsheet or Notebook: A dedicated system for recording observations, measurements, photos references, and scoring. A digital spreadsheet (Google Sheets, Excel) allows for easy data input and later analysis.
- Moisture Meter: (Optional but highly recommended) For detecting hidden moisture in walls, basements, or crawl spaces, indicating past or ongoing water intrusion.
- Long Measuring Stick/Pole: (Optional) Useful for checking depths in hard-to-reach areas like sump pits or evaluating ground clearance.
- Chalk or Spray Paint (Temporary): For marking observation points during a rain event.
Getting Started with Data Gathering
- Access the FEMA Map Service Center: Enter your property address to determine your official flood zone and Base Flood Elevation (BFE). Download your specific FIRM panel if available.
- Request Past Flood Data: Contact your county planning office, emergency management agency, or local historical society. Ask about historical flood depths, frequency, and any documented drainage problems in your specific neighborhood or street.
- Assemble Your Toolkit: Lay out all your tools to ensure you have everything readily available.
- Prepare a Documentation Spreadsheet/Notebook: Create columns for: “Location,” “Observation/Measurement,” “Photo/Video Reference,” “Vulnerability Score,” “Mitigation Idea,” and “Notes.”
Important Considerations for Preparation
- Safety First: This phase is generally safe if conducted from your desk. However, if you plan immediate outdoor checks, never begin during or after heavy rainfall or if any flooding is present in your area.
- Best Practices for Outdoor Checks:
- Daylight Hours: Conduct initial outdoor checks during clear daylight hours for optimal visibility.
- Protective Clothing: If inspecting crawlspaces or potentially damp areas, wear sturdy shoes, long sleeves, gloves, and a headlamp.
- Inform Others: Let a family member or friend know when and where you are performing the assessment, especially if going into confined spaces.
- Warnings:
- Never enter a flooded area: Floodwaters can hide hazards like electrical lines, sharp debris, and strong currents. They can also be contaminated.
- Be aware of weather conditions: Postpone outdoor assessments if storms are predicted.
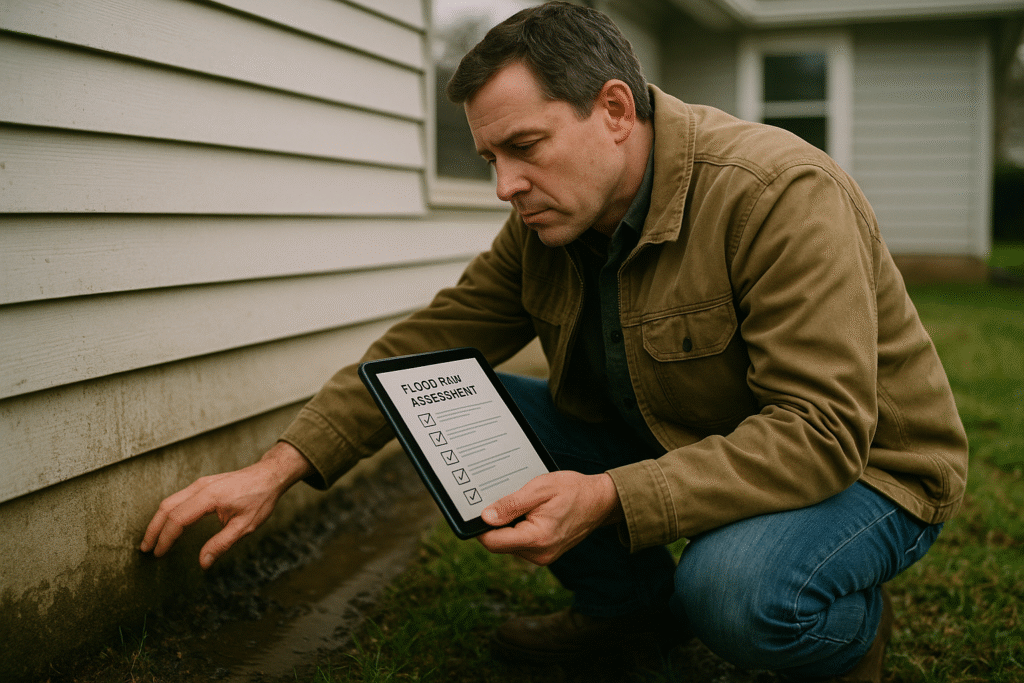
Step 2: Your Exterior Home Flood Risk Assessment
The exterior assessment focuses on how water interacts with your property before it even reaches the structure. This is often your first line of defense.
Key Exterior Vulnerabilities to Assess
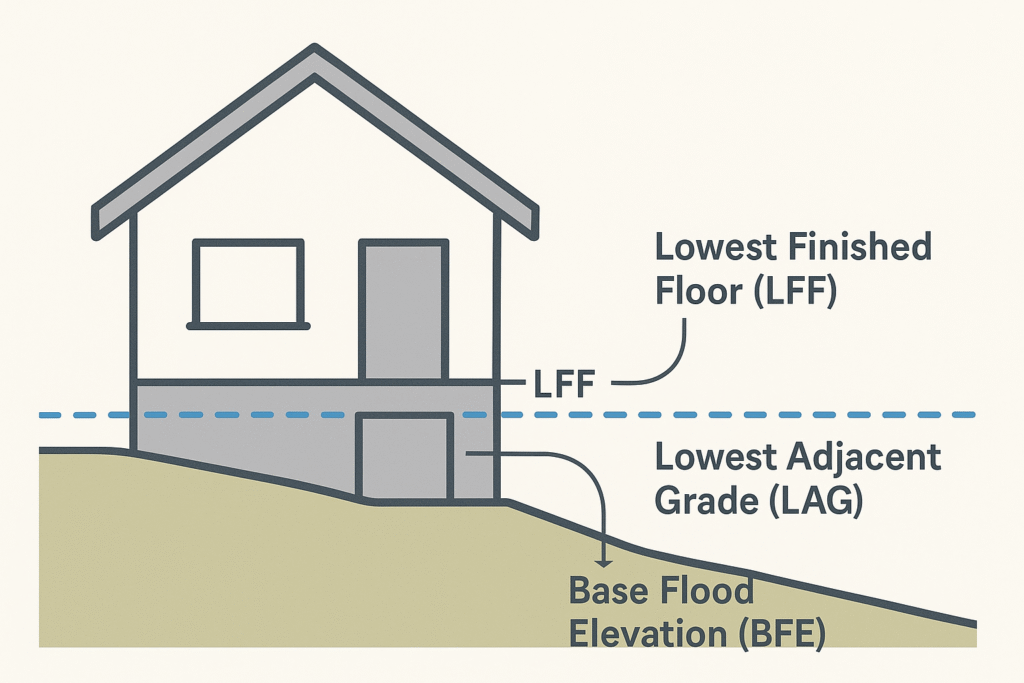
- Foundation Height vs. Base Flood Elevation (BFE): This is paramount. Compare the lowest finished floor (LFF) or lowest adjacent grade (LAG) of your home to your property’s BFE. Homes built below or close to the BFE are at higher risk. Understand terms like “freeboard” (the extra elevation above BFE, often required by building codes for added safety).
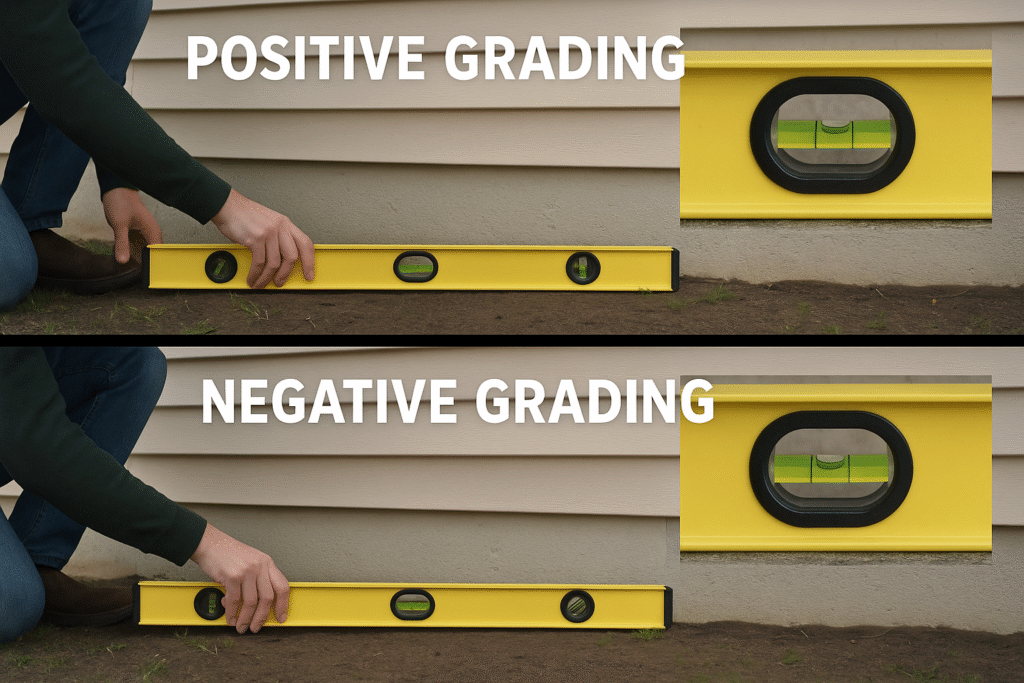
- Land Grading and Slope: Observe how the ground slopes around your home. Ideally, it should slope away from your foundation at a minimum of a 6-5% grade for the first 10 feet. Negative grading (sloping towards the house) or flat grading will direct water towards your foundation.

- Condition of Storm Drains, Gutters, and Drainage Paths:
- Gutters: Clogged, leaky, or improperly pitched gutters will cause water to overflow directly next to your foundation.
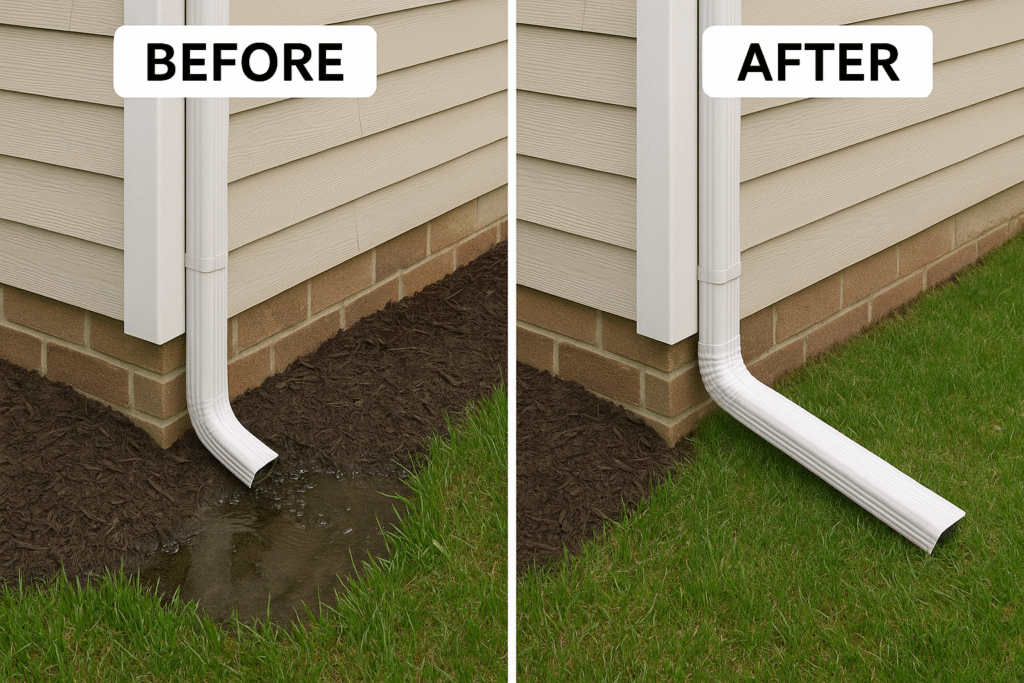
- Downspouts: Ensure downspouts extend at least 5-10 feet away from the foundation, discharging water onto a sloped surface or into a dedicated drainage system. Avoid discharging onto splash blocks that funnel water back.
- Drainage Paths/Swales: Identify natural or constructed pathways (e.g., swales, French drains, dry creek beds) designed to channel water away from your property. Check for blockages, erosion, or poor function.
- Permeability of Surfaces: Large areas of impervious surfaces (concrete driveways, patios) prevent water from soaking into the ground, increasing runoff towards your home. Consider how this impacts water flow.
Performing the Exterior Walkthrough
- Estimate Floor Height vs. BFE: Use your tape measure and elevation app to estimate the height of your lowest finished floor (LFF) relative to the existing ground level. Compare this with your identified BFE from FEMA maps. Document any significant discrepancies.
- Observe Water Flow (Ideal During Light Rain): This is the most crucial part. Walk the entire perimeter of your home during a light rain event (or soon after) to observe actual water flow.
- Look for: Areas where water pools near the foundation, where runoff concentrates, or where gutters overflow. Use chalk or temporary spray paint to mark these problem areas.
- Follow the Water: Trace the path of water from your roof to your property boundaries. Where does it go? Does it flow away or towards your home?
- Inspect Gutters and Downspouts:
- Check for debris (leaves, twigs) that could cause clogs.
- Look for visible leaks or sagging sections.
- Confirm downspouts are securely attached and extend far enough from the foundation. Ensure extensions are functional and not themselves creating pooling.
- Examine Landscaping & Grading: Identify any landscaping features (e.g., garden beds, trees) that might trap water or direct it towards your home. Note areas where the soil has settled or eroded, creating depressions.
Important Considerations for Exterior Audit
- Safety: This is generally a low-risk task, but be mindful of slippery surfaces during or after rain. Wear appropriate footwear.
- Best Practices:
- Timing is Key: Conducting this part of the audit during light rain provides the most accurate visualization of water flow and drainage issues.
- Comprehensive Coverage: Don’t just focus on obvious problem spots; systematically walk every foot of your perimeter.
- Warnings:
- Call 811 Before Digging: If you identify grading issues that might require significant earth movement, always call 811 (or your local “Dig Safe” equivalent) before any digging or grading to avoid damaging underground utilities. This is a free service.
- Don’t ignore subtle signs: Even small pooling can indicate a larger problem over time.
Step 3: Auditing Entry Points & Ingress Paths
Once water reaches your structure, it will find the path of least resistance to get inside. This step focuses on identifying those vulnerable points. Water often enters through hydrostatic pressure or direct overflow.
Common Water Entry Points
- Low Door Thresholds: Especially basement doors, sliding glass doors, or even ground-level exterior doors where the threshold is flush with or lower than the exterior grade.
- Foundation Cracks: Even hairline cracks can allow significant water intrusion over time, especially under hydrostatic pressure (water pressing against the foundation). Larger structural cracks pose a more immediate threat.
- Basement Window Wells: These depressions around basement windows are notorious water traps if not properly drained or covered.
- Vents and Utility Penetrations: Any opening through the foundation or walls (e.g., dryer vents, pipes for water lines, gas lines, electrical conduits, outdoor spigots) that is not properly sealed can be a direct pathway for water.
- Sump Pump Failures: While a sump pump removes water, a power outage or pump failure can quickly lead to basement flooding if it’s your primary defense.
- Backflow from Sewer Lines: If your home’s drainage is connected to a municipal storm sewer, heavy rainfall can overwhelm the system, causing sewage or stormwater to back up into your home through drains or toilets.
How to Conduct the Entry Point Audit
- Inventory All Openings Below Flood Level: Systematically walk around your foundation (both interior basement/crawl space and exterior) and list every opening or penetration. Measure its elevation relative to the exterior grade.
- Test Door/Window Seals:
- Visual Check: Look for visible gaps, cracks, or deterioration in weatherstripping around doors and windows.
- Light Test: On a sunny day, close the door/window and look for light shining through gaps from the inside.
- Dollar Bill Test: For doors, close the door on a dollar bill. If you can easily pull it out, the seal isn’t tight enough.
- Water Spray Test (Caution!): For exterior doors/windows, carefully spray water from a hose at the seam from a distance while someone observes from inside for immediate leaks. Stop immediately if water enters.

- Examine Foundation for Cracks and Seepage:
- Visual Inspection: Use a flashlight to meticulously inspect all foundation walls (interior and exterior, if accessible). Look for hairline cracks, stair-step cracks in masonry, or horizontal cracks (which can indicate structural issues).
- Signs of Seepage: Look for efflorescence (white, powdery mineral deposits on masonry, indicating water has seeped through and left minerals behind), water stains, dampness, or peeling paint/wallpaper on interior basement walls.
- Drainage in Window Wells: Check if window wells have proper gravel drainage to a footing drain, or if they are simply accumulating water. Consider covers for all basement window wells.
- Check Utility Penetrations: Ensure all areas where pipes, wires, or vents pass through the foundation or walls are tightly sealed with appropriate waterproof caulk or hydraulic cement.
- Backflow Prevention: If your property has a basement and is connected to a municipal storm sewer system, verify if you have a backflow prevention valve installed on your main sewer line. Inspect its visible condition if accessible.
Important Considerations for Entry Point Audit
- Safety: This is a moderate-risk task.
- Wear Gloves and Knee Protection: Especially if inspecting damp, dusty, or confined crawl spaces.
- Ventilation: Ensure adequate ventilation if working in basements or crawl spaces, particularly if mold is suspected.
- Avoid Contact: Do not directly touch any suspected mold growth without proper personal protective equipment.
- Best Practices:
- Systematic Approach: Go room by room, wall by wall, to ensure no opening is missed.
- Documentation: Photograph every crack, stain, or potential entry point, noting its size, location, and severity.
- Professional Guidance: For any significant foundation cracks (e.g., wider than 1/8 inch, horizontal, stair-step, or those showing signs of foundation movement), always seek professional guidance from a structural engineer or a foundation repair specialist. DIY fixes on structural issues can be dangerous and ineffective.
- Warnings:
- Hydrostatic Pressure: Understand that even a small crack can leak significantly under hydrostatic pressure. Surface patching may not be sufficient if the underlying drainage problem isn’t addressed.
- Foundation Repairs: Never attempt to repair significant foundation issues without professional assessment and guidance.
Step 4: Interior Systems & Critical Asset Assessment
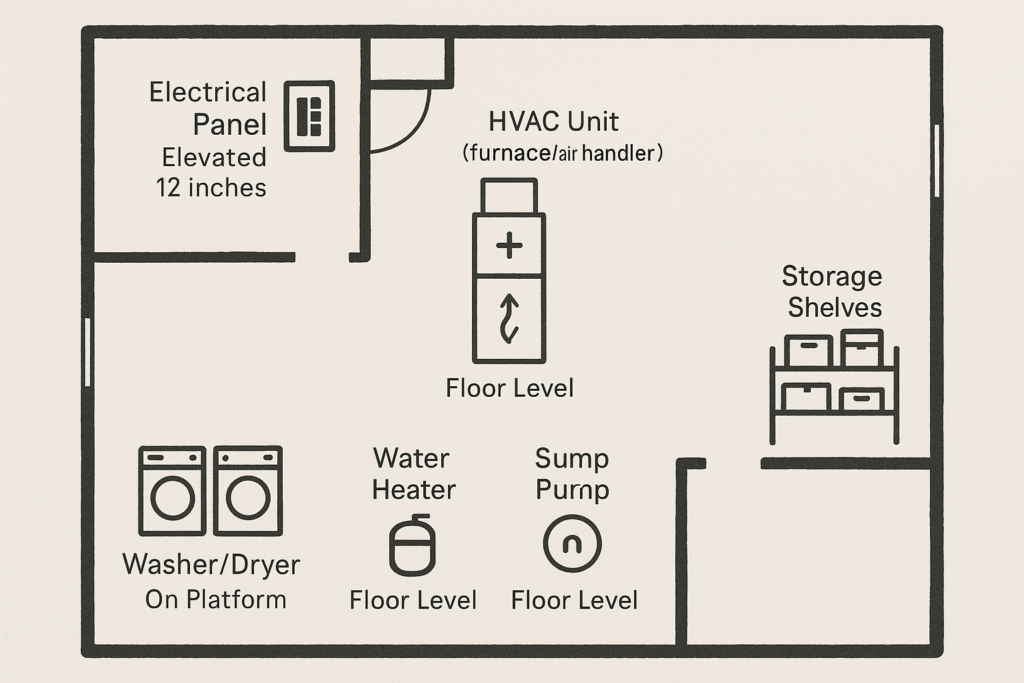
Once water breaches the exterior defenses, its impact is determined by what assets are vulnerable inside your home. This step focuses on mapping the location and elevation of critical systems and valuable belongings.
Identifying Critical Assets
Understanding which items are most at risk, and why, is key to prioritizing mitigation efforts.
- Electrical Panels: Extremely vulnerable. Any contact with water can cause short circuits, power outages, and severe electrocution hazards.
- HVAC Units (Furnaces, Air Handlers, Condensers): Often located in basements or crawl spaces, these are expensive to repair or replace if submerged. Floodwaters can damage electrical components, motors, and delicate coils.
- Water Heaters: Typically floor-mounted in basements. While their primary function involves water, floodwater from outside can damage internal components and electrical systems, requiring replacement.
- Washers and Dryers: Appliances in basements are susceptible to damage, especially their electronic controls and motors.
- Storage Shelves & Personal Belongings: Boxes of photographs, sentimental items, important documents, electronics, furniture, and clothing stored directly on basement floors or low shelves are at high risk of water damage, mold, and destruction.
- Building Materials: Drywall, insulation, carpeting, and wood framing below grade are highly susceptible to water absorption, leading to mold growth, structural damage, and costly remediation.
Mapping Your Interior Vulnerabilities
- Sketch a Basic Floor Plan: Create a simple drawing of your basement or lowest level. This doesn’t need to be professional, just clear enough to map assets.
- Record Elevation of Each System/Asset:
- For electrical panels, HVAC units, and water heaters, measure the height of their lowest vulnerable point (e.g., the bottom of the electrical box, the lowest control panel, the base of the heater) relative to the finished floor.
- For storage, note the height of the lowest shelf or item.
- [Image Placeholder: Simple floor plan sketch with critical assets marked and their elevations noted.]
- Note Any Existing Protective Barriers or Elevations: Document if any systems are already elevated on blocks, platforms, or if there are existing flood barriers or water-resistant storage solutions in place.
- Inspect Interior Walls and Floors: Look for any water staining, discoloration, musty odors, or visible mold growth, especially along baseboards or in corners. This could indicate past unseen water intrusion.
- Check Sump Pump: If you have one, verify its location, functionality (test with a bucket of water), and if it has a battery backup or alarm system.
Important Considerations for Interior Audit
- Safety: High Caution Around Electrical Systems!
- Cut Power: Never attempt to inspect electrical outlets, wiring, or components if there’s any standing water or dampness. If you need to physically inspect an electrical panel, always cut power to the main breaker before opening the panel cover.
- Professional Electrician: If you suspect any electrical damage or need to move/elevate electrical systems, always consult a licensed electrician.
- Never Enter a Flooded Basement: As stated before, this is extremely dangerous due to electrocution risks, hidden debris, and potential contamination.
- Best Practices:
- Clear Labeling: Label all circuits on your electrical panel clearly.
- Elevate, Don’t Store Low: The simplest defense for belongings is elevation. Even a few inches off the floor can make a significant difference.
- Regular Appliance Maintenance: Ensure water heaters, washing machines, and HVAC systems are regularly serviced to prevent internal leaks that exacerbate flood damage.
- Warnings:
- Mold Concerns: If you find mold, consult the External Reference: EPA Mold Cleanup Guidelines for safe remediation. Small areas can be DIY, but larger infestations require professional help.
- Contaminated Water: Assume any floodwater in a basement is contaminated with sewage or hazardous materials. Always use appropriate PPE during cleanup.
Step 5: How to Score Your Flood Hazard & Vulnerability
A systematic scoring approach helps you understand the magnitude of your flood risk and prioritize mitigation efforts. This isn’t about precise engineering, but about creating a comparative assessment for your own property.
Understanding the Hazard-Risk-Vulnerability Matrix
This matrix helps quantify your risk by breaking it down into components:
- Hazard: Refers to the characteristics of the flood event itself.
- Depth: How high will the water be? Even 6 inches can cause significant damage.
- Type: What kind of flood (flash, riverine, urban drainage, sewer backup)? Each has different characteristics.
- Likelihood/Frequency: How often is it expected (e.g., 100-year flood zone, history of frequent urban flooding)?
- Exposure: Refers to what assets are present in the flood path.
- Asset Location: Is it in the basement, crawl space, or ground floor?
- Asset Value: Financial value (e.g., HVAC unit, finished basement) and sentimental value (e.g., family photos, heirlooms).
- Vulnerability: Refers to the susceptibility of the asset to damage if exposed to the hazard.
- Susceptibility to Damage: How easily will it be damaged by water (e.g., drywall vs. concrete)?
- Adaptive Capacity: Your ability to move or protect the asset before a flood (e.g., light furniture vs. fixed machinery).
Steps to Calculate Your Vulnerability Score
- Create a Matrix: Set up a spreadsheet or a table with rows for each identified vulnerability (e.g., “Basement door threshold,” “Electrical panel,” “Family photo boxes”) and columns for:
- Vulnerability/Asset: (e.g., “Basement Wall Cracks”)
- Hazard Score (1-5): (1=Very Low, 5=Very High – based on potential depth/likelihood for this asset’s location)
- Exposure Score (1-5): (1=Low Value/Easy to Move, 5=High Value/Fixed Asset)
- Vulnerability Score (1-5): (1=Highly Resistant, 5=Highly Susceptible)
- Overall Vulnerability Score: (e.g., Average of the three scores, or a weighted sum, where a higher score indicates higher risk).
- Mitigation Priority: (High, Medium, Low)
- Notes:
- Rate Each Factor (1-5): For each specific vulnerability or asset you identified in Steps 2-4, assign a score:
- Example for “Basement Electrical Panel”:
- Hazard: If BFE is above its height or historical urban flooding affects your basement, score 4-5. If only minor pooling is possible, score 2-3.
- Exposure: Score 5 (Extremely high value, fixed asset, critical system).
- Vulnerability: Score 5 (Highly susceptible to permanent damage and creates an extreme hazard).
- Overall: High.
- Example for “Furniture on Basement Floor”:
- Hazard: As above.
- Exposure: Score 3-4 (High value, can be moved but requires effort).
- Vulnerability: Score 4 (Highly susceptible to water/mold damage).
- Overall: Medium-High.
- Example for “Basement Electrical Panel”:
- Calculate an Overall Vulnerability Score: Sum or average the scores for each item to get a general idea. A simple approach is to sum the three scores (Hazard + Exposure + Vulnerability) for each item, giving you a total out of 15.
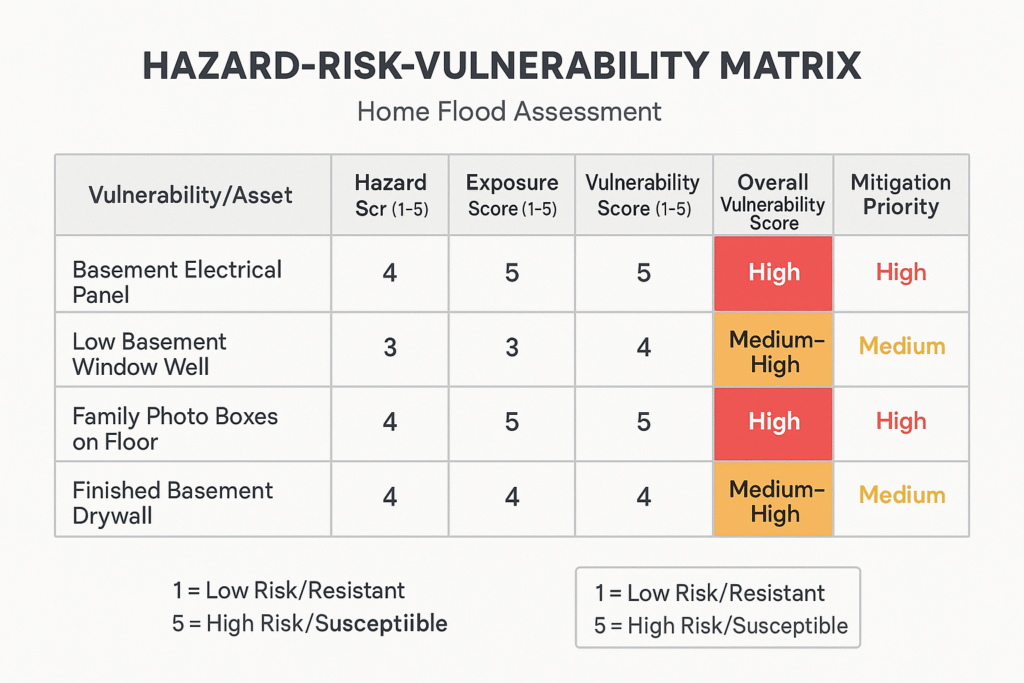
- Prioritize: Items with higher overall scores represent greater immediate risks and should be prioritized for mitigation.
Important Considerations for Scoring
- Safety: This is a safe, desk-based task.
- Best Practices:
- Include Sentimental Items: Don’t just consider monetary value. Assign a high exposure score to irreplaceable sentimental items (e.g., family photos, heirlooms) even if their financial value is low.
- Visual Aids: Use your annotated photos and floor plans from previous steps as visual references while scoring.
- Realistic Assessment: Be honest about your home’s vulnerabilities. It’s better to overestimate risk than underestimate it.
- Warnings:
- Store Irreplaceables: Always store vital documents, sentimental items, and highly valuable small electronics in waterproof, elevated containers or offsite (e.g., cloud storage for documents/photos, safety deposit box).
- Regular Review: Your risk profile can change. Re-evaluate your scoring annually or after any significant property changes or local flood events.
Step 6: Prioritizing & Planning Flood Mitigation
Once you’ve identified and scored your vulnerabilities, it’s time to plan how to reduce your risk. Mitigation strategies broadly fall into two categories: Resistance and Resilience.
Types of Flood Mitigation Solutions
- Resistance Measures (Dry Floodproofing): These aim to keep water out of your home.
- Barriers: Temporary (e.g., sandbags, deployable flood barriers for doors) or permanent (e.g., floodwalls, berms around the property).
- Sealants: Waterproofing foundation cracks with hydraulic cement, epoxy injections, or exterior foundation membranes. Sealing around windows, doors, and utility penetrations with waterproof caulk.
- Backflow Prevention Valves: Installing check valves on sewer lines to prevent water from backing up into the house.
- Resilience Measures (Wet Floodproofing & Elevation): These aim to minimize damage if water enters your home, or to allow water to pass through safely.
- Elevated Systems: Raising critical equipment like HVAC units, water heaters, electrical panels onto platforms, concrete blocks, or higher levels.
- Durable Materials: Replacing flood-vulnerable materials in basements or lower levels with flood-resistant ones (e.g., concrete flooring, ceramic tile, pressure-treated wood, closed-cell foam insulation, moisture-resistant drywall).
- Flood Vents: For crawl spaces or enclosed areas, installing flood vents allows water to flow through the space, equalizing hydrostatic pressure and preventing structural damage.
- Improved Drainage: Regrading land to slope away from the foundation, installing French drains, swales, or rain gardens to divert water.
- Sump Pumps: Installing or upgrading sump pumps, ensuring battery backups and alarms.
Developing Your Mitigation Roadmap
- Categorize Solutions per Vulnerability: For each high-scoring vulnerability from Step 5, list specific resistance and resilience solutions.
- Example: If “Basement Electrical Panel” is high-risk, solutions include “Elevate electrical panel,” “Install flood-resistant drywall around panel,” “Ensure proper exterior drainage.”
- Align Retrofits with Other Renovation Schedules: If you’re planning a basement renovation, this is the ideal time to incorporate flood resilience measures, saving money and effort.
- Cost-Benefit Analysis: Roughly estimate the cost of each mitigation solution vs. the potential damage it prevents. Prioritize high-impact, low-cost solutions first.
- Keep Photo Documentation and Receipts: For every mitigation measure you implement, take “before” and “after” photos. Keep meticulous records of all expenses, contractor invoices, and permits. This documentation is vital for insurance purposes and grant applications.
Important Considerations for Mitigation Planning
- Safety: Variable risk, depending on the complexity of the solution. Simple DIY fixes are low-risk, but structural changes are high-risk.
- Best Practices:
- Follow FEMA Technical Bulletins: For major retrofits, consult FEMA’s comprehensive technical bulletins (e.g., TB 1-9) for guidance on flood-resistant construction techniques.
- Holistic Approach: Address problems systematically. Fixing one issue might expose another if you don’t consider the entire water pathway.
- Warnings:
- Permits May Be Required: For any structural changes, significant grading, or changes to plumbing/electrical systems, permits from your local municipality are almost certainly required. Always check with your local planning or building department before starting work.
- Professional Expertise: Consult certified contractors for complex retrofits (e.g., foundation repair, elevating entire structures, installing major drainage systems).
Step 7: Creating an Emergency Flood Plan
Even with comprehensive mitigation, a robust emergency plan is your final line of defense. This plan ensures the safety of your household and helps minimize damage during an active flood event.
Essential Components of Your Flood Plan
- Alerts and Communication Routes:
- NOAA Weather Alerts: Crucial for receiving official flood warnings.
- Local Emergency Alerts: Sign up for county/city-specific notifications.
- Communication Plan: Designate a primary out-of-state contact person. Establish how family members will communicate if separated and cell service is down (e.g., texting, social media).
- “Go-Bag” with Essentials: A waterproof, easily accessible bag for each family member.
- Contents: Important documents (copies: insurance policies, IDs, deeds), medications, first-aid kit, non-perishable food, water, battery-powered radio, flashlight, extra batteries, whistle, cash, change of clothes, toiletries, comfort items for children/pets.
- Flood-Prep Checklist: A printed list of actions to take when a flood warning is issued.
- Examples: Move valuables to higher floors, secure outdoor furniture, clear storm drains, fill bathtubs with water for non-drinking use, shut off utilities (gas, electricity, main water valve) if safe.
- Post-Flood Cleanup Steps: Basic guidelines for immediate actions after water recedes.
- Examples: Document damage with photos/videos, contact insurance, begin drying/ventilating, address mold.
Putting Your Plan into Action
- Sign Up for NOAA Weather Alerts: Register your phone and email for alerts specific to your geographic area.
- Draft and Rehearse Evacuation Routes: Identify primary and secondary evacuation routes from your home and neighborhood. Practice these routes with your family. Know where local shelters are located.
- Pre-Stage Equipment: Keep essential flood-prep equipment readily accessible:
- Sump Pumps: Ensure they are working and have battery backups.
- Sandbags: If you use them, know where to get them or have a supply ready.
- Plastic Sheeting/Tarps: For covering sensitive items or temporarily diverting water.
- Waterproof Bins: For last-minute protection of ground-level items.
- Create a Digital Backup: Store copies of your essential documents (insurance policies, property deeds, medical records) in a secure cloud service.
Important Considerations for Emergency Planning
- Safety: Safe during the planning phase. The execution phase during a flood can be extremely dangerous.
- Best Practices:
- Review Quarterly: Your plan isn’t static. Review and update it at least quarterly, or after any changes in household members, contact information, or local infrastructure.
- Physical Copy: Keep a printed copy of your emergency plan and essential contacts in your “go-bag.”
- Warnings:
- Never Re-enter a Flooded Home Until Officially Cleared: Do not return to your home until authorities declare the area safe. Be aware of structural damage, gas leaks, and electrical hazards.
- Do Not Drive Through Floodwaters: “Turn around, don’t drown.” Just six inches of moving water can sweep you away, and two feet can carry away most vehicles.
External Reference: Ready.gov Flood Preparation – An excellent resource for general disaster preparedness.