15 DIY Home Upgrades: Cut Energy Bills & Boost Home Comfort
Are your energy bills too high? Solve energy waste with these safe, DIY-friendly upgrades—no tools, permits, or professionals needed. Take action now to cut costs and improve home comfort.
Table of Contents
- Why Tackle Energy Waste with Low-Tech DIY Solutions?
- Stop Drafts Around Doors and Windows: An Essential Air Sealing Fix
- Prevent Heat Loss with Removable Window Insulation Film: Your DIY Thermal Barrier
- Block Unwanted Heat with Thermal or Blackout Curtains: A Simple Insulation Boost
- Seal Gaps on Door Frames with Weatherstripping: Easy Air Leak Solution
- Eliminate Air Infiltration with Door Sweeps: Quick Draft Protection
- Insulate Attic Hatches and Drop-Down Stairs: Solve Top-Floor Leaks
- Seal Hidden Drafts at Electrical Outlets and Switches: Tackle Cold Spots
- Reduce Water Heating Costs by Wrapping Hot Water Pipes: Improve Efficiency Now
- Combat Cold Floors with Reflective Insulation in Crawlspaces: DIY Floor Comfort
- Save Water & Energy by Installing Faucet Aerators: An Easy Upgrade
- Lower Hot Water Usage with Low-Flow Showerheads: Simple Shower Savings
- Prevent Heat Escape by Closing Fireplace Dampers: Your Free Solution
- End Phantom Power Waste with Smart Power Strips: Automated Energy Savings
- Optimize HVAC Performance by Adjusting Thermostat Settings Seasonally: Your Smart Strategy
- Warm Up Cold Zones with Rugs or Floor Mats: Instantly Boost Comfort
- FAQ: Your Questions on Solving Energy Problems Answered
- Final Tips & Call to Action: Start Your Energy-Saving Journey Today
1. Why Tackle Energy Waste with Low-Tech DIY Solutions?
Are you frustrated with high energy bills? These everyday low-cost solutions offer homeowners powerful energy-saving results—without requiring big renovations or professional help. They are ideal DIY home improvements designed to solve common energy problems directly.
- No building permits or HVAC contractors needed to start saving.
- Fast ROI: many deliver 10–30% lower heating and cooling bills, helping you cut costs depending on your home’s age and climate.
- Simple materials, safe for both rental properties and owner-occupied settings.
- Usually completed within an hour per fix, making them quick home upgrades you can do yourself.
“Our winter energy bills dropped 22% after we solved the drafty kitchen window problem and installed a door sweep. It dramatically improved our home comfort.”
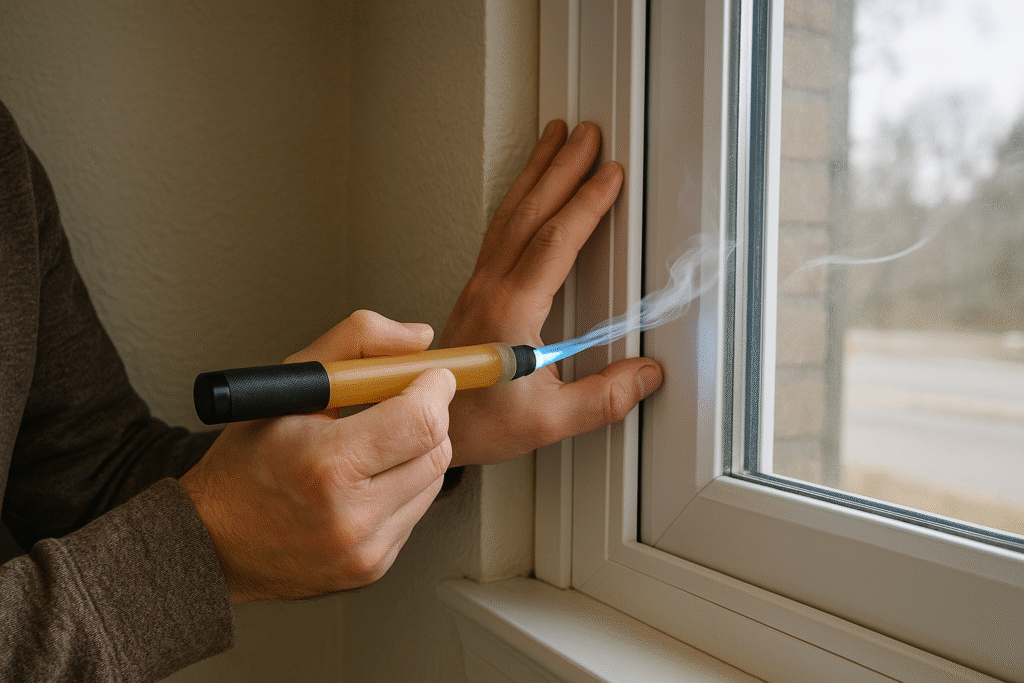
2. Stop Drafts Around Doors and Windows: An Essential Air Sealing Fix
Problem & Why This Helps
Drafts around older windows and doors are a major source of energy loss, allowing costly heat to escape in winter and cold air to leak in during summer. This problem leads to uncomfortable homes and higher utility bills. Applying silicone or rope caulk is a fundamental air sealing solution that directly closes these gaps, effectively stopping drafts and improving home comfort. Studies show proper sealing can reduce heat loss by 10–20%, directly lowering energy use.
How to Take Action (Step-by-Step DIY)
- Spot the problem: Conduct a quick DIY energy audit by surveying the frame with a flashlight or smoke pencil to find hidden air leaks.
- Prepare the area: Clean the surface with mild soap and let it dry fully for optimal adhesion.
- Load your tool: Load silicone caulk into a caulking gun.

- Apply the solution: Replace existing drafty caulk or rope caulk with a continuous bead around frame edges, focusing on creating tight seals.
- Finish the job: Tool the bead smooth with your finger or a caulk-tool for a flush finish.

- Allow to set: Let dry 24 hours before exposing to moisture.
“According to Home Energy Saver, a tool by the U.S. Department of Energy, proper air sealing of leaks can solve heating cost problems by saving homeowners up to 10%–15%,” making it a top energy-saving solution.
Hygiene & Recommendation
- Safety: Wear gloves to avoid skin irritation from wet caulk; ventilate adequately.
- Best Practices: Replace caulk yearly or when shrinking/cracking is visible to maintain the airtight seal.
- Warnings: Don’t overfill joints to prevent interior condensation and mold risk.
3. Prevent Heat Loss with Removable Window Insulation Film: Your DIY Thermal Barrier
Problem & Why This Helps
Are your single-pane windows letting heat escape in winter or causing your AC to overwork in summer? This common problem leads to uncomfortable rooms and wasted energy. Shrink-film kits offer a DIY solution that forms a near-invisible thermal barrier, effectively preventing heat loss and improving your home’s thermal performance. The U.S. DOE cites that these films can reduce heat loss up to 55% in single-pane windows, making a noticeable difference.
How to Take Action (Step-by-Step DIY)
- Measure and cut: Measure the glass area and trim film to fit with ~½ inch margin.

- Prepare the surface: Clean window thoroughly; apply double-sided tape around the frame.
- Position the film: Stick film to tape, stretch tight over window.
- Activate the film: Use a hair dryer from 6” away to shrink film smooth, creating a taut insulating layer.

- Remove later: Peel off film and tape, clean residue with warm soapy water when the season changes.
“Window insulation film is a remarkably effective and inexpensive way to boost the R-value of older windows without costly replacement,” says Sarah Miller, a certified energy auditor and expert in home energy efficiency solutions.
Hygiene & Recommendation Block
- Safety: Do not overheat film—keep hair dryer moving.
- Best Practices: Replace annually if tearing occurs for consistent insulation.
- Warnings: Film is not tempered glass—avoid piercing near pets or children.
4. Block Unwanted Heat with Thermal or Blackout Curtains: A Simple Insulation Boost
Problem & Why This Helps
Are your windows failing to block extreme temperatures, leading to uncomfortable rooms and higher heating/cooling bills? This is a common energy waste problem. Thermal or blackout curtains are a simple DIY solution made from tightly woven, insulated fabric. They create an air pocket that acts as an additional layer of insulation, significantly reducing heat transfer. The U.S. Department of Energy estimates they can reduce heat loss by up to 25% in winter and reduce heat gain by up to 33% in summer, directly solving comfort issues and saving energy.
How to Take Action (Step-by-Step DIY)
- Measure for success: Measure your window dimensions, adding at least 6-12 inches to the width and height for proper coverage and maximum insulation.
- Choose wisely: Select thermal or blackout curtains with a white plastic backing (which reflects heat) for optimal energy efficiency.

- Install the hardware: Install a sturdy curtain rod above your window frame, extending beyond the frame’s width to allow curtains to fully cover the window and block air leaks.
- Hang your solution: Hang the curtains, ensuring they are long enough to reach the windowsill or floor to create a good seal.

- Use strategically: Close curtains fully during extreme temperatures (cold nights, hot days) to maximize energy savings.
Studies from the American Society of Heating, Refrigerating and Air-Conditioning Engineers (ASHRAE) consistently highlight how window coverings can solve energy performance problems in buildings.
Hygiene & Recommendation Block
- Safety: Ensure curtain rods are securely installed to prevent falling.
- Best Practices: For maximum effect, choose curtains that are wider than your window and extend beyond the frame, and long enough to reach the floor or windowsill. Consider using a valance or cornice to further block airflow.
- Warnings: Be mindful of pets or small children who might pull on curtains or cords if present.
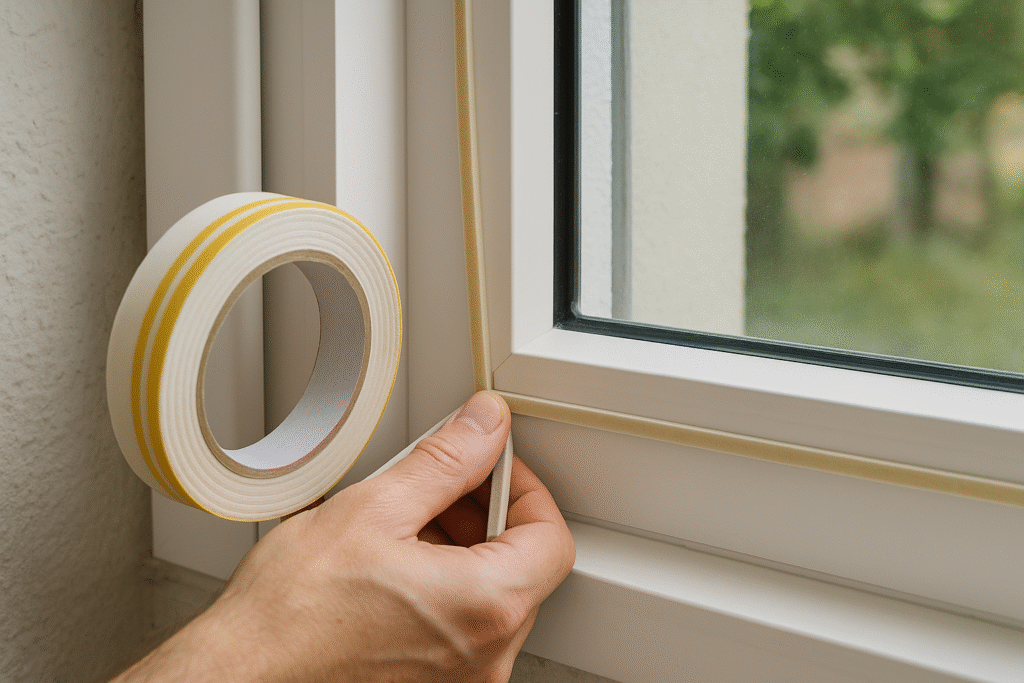
5. Seal Gaps on Door Frames with Weatherstripping: Easy Air Leak Solution
Problem & Why This Helps
Do you feel drafts around your exterior doors, indicating costly air leaks? This problem allows heated or cooled air to escape, wasting energy and making your home uncomfortable. Weatherstripping is a highly effective DIY material that you can apply around doors and windows to seal these gaps. The U.S. Environmental Protection Agency (EPA) notes that sealing air leaks with weatherstripping can solve high heating and cooling costs, saving homeowners about 10%–20%.
How to Take Action (Step-by-Step DIY)
- Prepare the surface: Clean the door frame thoroughly where the weatherstripping will be applied, ensuring it’s free of dirt and debris.
- Measure and cut: Measure the length of each side of the door frame where weatherstripping is needed. Cut the weatherstripping to the appropriate lengths.
- Image Placeholder: Photo of someone measuring and cutting a roll of weatherstripping.
- Apply the strip: Peel off the adhesive backing (for self-adhesive types) and press the weatherstripping firmly along the door frame, starting from the top.

- Ensure a snug fit: For foam or vinyl V-strip types, press them into the gap, ensuring a snug fit when the door is closed. Test by closing the door to ensure a good seal against drafts.
The U.S. Department of Energy (DOE) emphasizes that weatherstripping and caulking are among the most cost-effective ways to solve energy waste problems in your home.
Hygiene & Recommendation Block
- Safety: No major safety concerns, but wear gloves if handling any adhesive-heavy strips for prolonged periods.
- Best Practices: Choose durable weatherstripping materials like EPDM rubber or silicone for longer-lasting results. Replace weatherstripping every few years or when it shows signs of wear, cracking, or loss of elasticity.
- Warnings: Avoid over-compressing weatherstripping, which can make doors difficult to close.
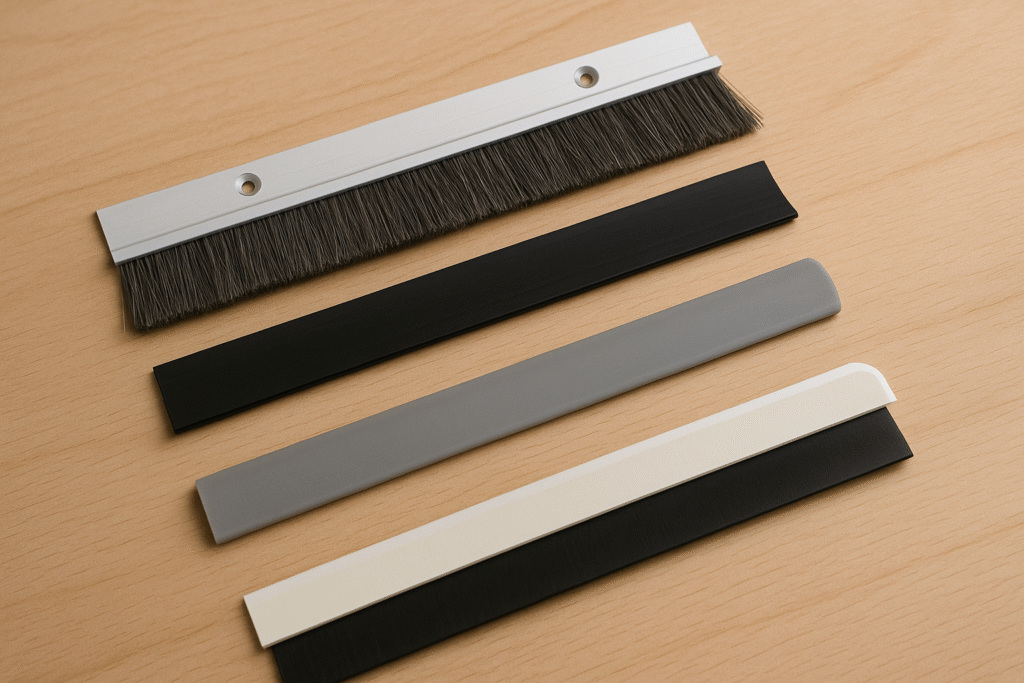
6. Eliminate Air Infiltration with Door Sweeps: Quick Draft Protection
Problem & Why This Helps
Is there a noticeable gap at the bottom of your exterior doors, letting in cold air, dust, or even pests? This problem is a direct route for air infiltration, undermining your heating and cooling efforts. Adding a door sweep is a simple DIY solution attached to the bottom of a door to seal this gap. This addition effectively blocks drafts and prevents heat loss or gain, especially around exterior doors, helping you solve comfort issues and save on energy.
How to Take Action (Step-by-Step DIY)
- Measure your door: Measure the width of your door.
- Select your sweep: Choose a door sweep that matches your door type (e.g., screw-on, adhesive) and is slightly longer than the door’s width if trimming is needed.
- Prepare the surface: Clean the bottom edge of the door where the sweep will be installed.
- Install the sweep: For screw-on types, align the sweep with the bottom of the door, mark screw holes, drill pilot holes (if necessary for wood doors), and attach with screws. For adhesive types, peel off the backing and press firmly along the bottom edge of the door.
- Test the seal: Ensure the sweep makes consistent contact with the threshold when the door is closed without impeding opening/closing, creating an effective air barrier.
“Door sweeps are often overlooked but incredibly effective,” says a spokesperson from the National Renewable Energy Laboratory (NREL), “directly solving the problem of common thermal bridges at the base of exterior doors and contributing to substantial energy savings.”
Hygiene & Recommendation Block
- Safety: When using screws, be careful not to overtighten and strip the screw holes.
- Best Practices: Select a door sweep material appropriate for your climate and traffic. Brush-style sweeps are good for uneven thresholds, while rubber or silicone offer a tighter seal.
- Warnings: Ensure the door sweep doesn’t drag excessively on the floor or carpet, which can wear it down quickly or damage flooring.
7. Insulate Attic Hatches and Drop-Down Stairs: Solve Top-Floor Leaks
Problem & Why This Helps
Unsealed and uninsulated attic hatches or drop-down stairs are common culprits for significant heat loss in winter and heat gain in summer. They act as direct conduits between your living space and an unconditioned attic, creating a major energy drain. Insulating and air sealing these access points is a critical DIY step that can dramatically improve your home’s thermal envelope and reduce energy waste, leading to noticeable energy savings and improved home comfort.
How to Take Action (Step-by-Step DIY)
- Measure the opening: Measure the dimensions of your attic hatch or the frame around your drop-down stairs.
- Cut the insulation: Cut rigid foam insulation boards (e.g., polystyrene or polyisocyanurate) to fit snugly within or on top of the hatch/frame. Layers can be glued together for more insulation.

- Create a box (if needed): For drop-down stairs, create an insulated “box” that fits over the folded stairs in the attic, or attach insulation to the top of the stair structure.
-

- Seal the perimeter: Apply weatherstripping around the perimeter of the hatch opening or frame to create an airtight seal when closed.
- Secure your work: Secure the insulation in place using adhesive, tape, or light-duty screws, ensuring it doesn’t interfere with the opening and closing mechanism.
The ENERGY STAR program emphasizes that proper insulation of accessible attic spaces, including hatches, is crucial for solving temperature inconsistency problems and maintaining consistent indoor temperatures, thus reducing energy consumption.
Hygiene & Recommendation Block
- Safety: Wear a dust mask and gloves when handling insulation, especially if it’s fiberglass. Be careful when working in attics, watching for unstable flooring or electrical wires.
- Best Practices: Aim for an R-value of at least R-10 for the attic hatch insulation. Ensure the hatch or stairs can still be easily opened and closed after insulation is applied.
- Warnings: Do not block any attic vents with insulation, as this can lead to moisture issues and mold.
8. Seal Hidden Drafts at Electrical Outlets and Switches: Tackle Cold Spots
Problem & Why This Helps
Are you feeling a slight chill near exterior walls, even when windows are closed? The problem could be hidden air leaks around electrical outlets and light switches. These openings act as mini-gateways for air infiltration, contributing to energy waste and cold spots. Installing foam gaskets behind outlet and switch plates is a simple, effective DIY solution that creates an air barrier, directly reducing unwanted airflow and improving home comfort and energy efficiency.
How to Take Action (Step-by-Step DIY)
- Crucial Safety Step: Turn off the power to the relevant circuits at your home’s electrical panel before starting.
- Remove covers: Use a screwdriver to carefully remove the cover plates from outlets and switches on exterior walls.
- Apply the gasket: Place a pre-cut foam gasket over the outlet or switch device, aligning the holes.

- Replace covers: Replace the cover plate and secure it with screws.
- Restore power: Turn the power back on at the circuit breaker.
The EPA’s ENERGY STAR program identifies sealing common air leaks, including those around electrical boxes, as a key strategy for solving home energy efficiency problems and reducing overall energy consumption.
Hygiene & Recommendation Block
- Safety: ALWAYS turn off the power at the circuit breaker before working on electrical outlets or switches.Use a non-contact voltage tester to confirm the power is off.
- Best Practices: Only use gaskets designed for electrical outlets/switches. Check all outlets and switches on exterior walls.
- Warnings: Never attempt this without cutting power first. Do not use spray foam or caulk inside electrical boxes due to fire risk and code violations.
9. Reduce Water Heating Costs by Wrapping Hot Water Pipes: Improve Efficiency Now
Problem & Why This Helps
Is your water heater constantly working to keep water hot, even when it’s not being used? The problem is often heat loss from uninsulated pipes as hot water travels. Insulating hot water pipes is a simple DIY solution that helps maintain the water temperature as it travels from your water heater to your faucets and showerheads. This reduces heat loss, meaning your water heater doesn’t have to work as hard or as often to reheat water, directly saving energy and cutting your water heating bill.
How to Take Action (Step-by-Step DIY)
- Get your materials: Purchase pre-slit foam pipe insulation sleeves that match the diameter of your hot water pipes.

- Clean the pipes: Clean any dust or debris from the pipes.
- Wrap the pipes: Starting near the water heater, fit the pre-slit insulation around the hot water pipes, pressing the seams together firmly.

- Secure the insulation: Secure the insulation with electrical tape, zip ties, or specialized pipe insulation tape every foot or so, especially at joints and bends.
- Focus on initial run: Insulate at least the first 6 feet of hot water pipes leaving the water heater, and more if easily accessible.
According to the U.S. Department of Energy, insulating hot water pipes can solve the problem of heat loss by reducing temperature drop by 2∘F to 4∘F (about 1∘C to 2∘C), leading to direct energy savings and quicker hot water delivery.
Hygiene & Recommendation Block
- Safety: Ensure the water heater is off or the hot water supply is shut off before working directly on the pipes, though this project generally doesn’t require it if you’re only wrapping the exterior. Be careful of hot pipes if the water heater is on.
- Best Practices: Insulate both hot and cold water pipes if they run parallel and close to each other, as this also helps prevent condensation on cold pipes.
- Warnings: Do not insulate the pressure relief valve on your water heater or any other safety devices. Ensure insulation fits snugly without leaving gaps.
10. Combat Cold Floors with Reflective Insulation in Crawlspaces: DIY Floor Comfort
Problem & Why This Helps
Do your floors always feel cold, making your home less comfortable and causing you to turn up the heat unnecessarily? This problem is often due to heat transfer through uninsulated crawl spaces. Reflective insulation (often a radiant barrier) is a DIY solution that works by reflecting heat radiation. When applied to the floor joists in a crawlspace, it can significantly reduce heat transfer from the ground up into the living space, or vice-versa. This helps to keep your floors warmer in winter and cooler in summer, directly solving cold floor problems and improving home comfort.
How to Take Action (Step-by-Step DIY)
- Prepare the space: Clear any debris from the crawlspace floor and ensure it’s dry.
- Measure and cut: Measure the areas between the floor joists where the reflective insulation will be installed. Cut the reflective insulation (often a foil-faced bubble wrap or multi-layer foil) to fit snugly between the joists.
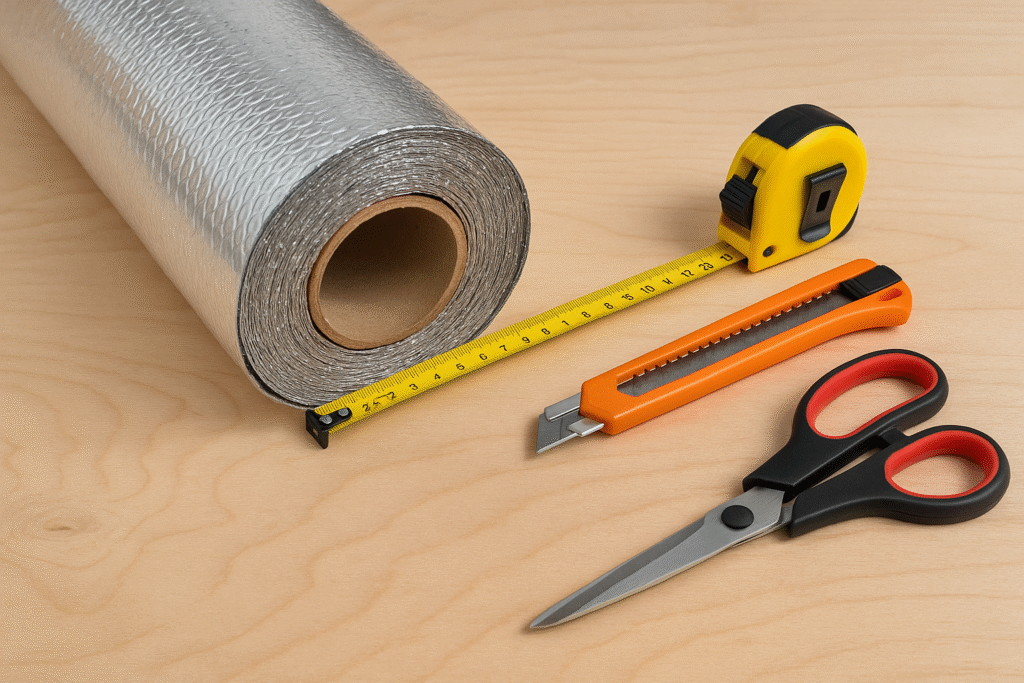
- Install the barrier: Staple or tape the reflective insulation to the underside of the subfloor between the joists, with the reflective side facing the direction of the heat source. Ensure a slight airspace remains on at least one side for maximum effectiveness.
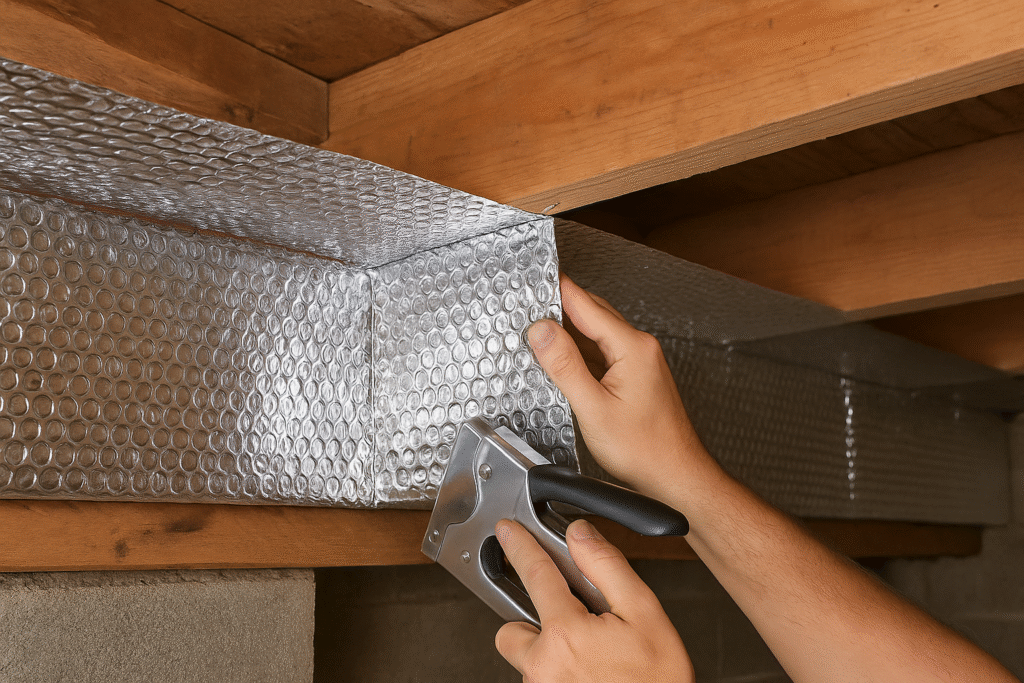
- Seal the seams: Seal any seams with reflective foil tape to create a continuous barrier.
The Lawrence Berkeley National Laboratory has conducted extensive research on radiant barriers, demonstrating their effectiveness in reducing heat flow problems in various building applications, leading to energy savings.
Hygiene & Recommendation Block
- Safety: Wear appropriate personal protective equipment (PPE) like gloves, a dust mask, and long sleeves when working in crawl spaces, as they can be dusty, dirty, or contain pests. Watch for sharp objects, nails, or electrical wiring.
- Best Practices: Ensure adequate ventilation in the crawlspace to prevent moisture buildup, especially if you are encapsulating the space.
- Warnings: Do not block any foundation vents with insulation unless the crawlspace is intentionally being conditioned as part of the home’s thermal envelope.
11. Save Water & Energy by Installing Faucet Aerators: An Easy Upgrade
Problem & Why This Helps
Are your faucets using more water than necessary, leading to higher water bills and increased water heating costs? This problem of excessive flow can be easily solved. Faucet aerators are small, mesh screens that screw onto the end of most faucets. They mix air into the water stream, creating a consistent, non-splashing flow while significantly reducing the amount of water used. By using less hot water, your water heater has less work to do, directly saving energy and cutting costs. The EPA’s WaterSense program states that aerators can reduce water use by 30% or more without sacrificing performance.
How to Take Action (Step-by-Step DIY)
- Remove old aerator: Unscrew the existing aerator from the faucet (turn clockwise to loosen). If it’s stubborn, use pliers with a cloth to prevent scratching.

- Clean the spout: Clean any sediment or debris from the faucet spout.
- Choose your aerator: Choose a new low-flow aerator (e.g., 0.5 to 1.5 gallons per minute (GPM) for bathrooms, 1.5 to 2.2 GPM for kitchens).
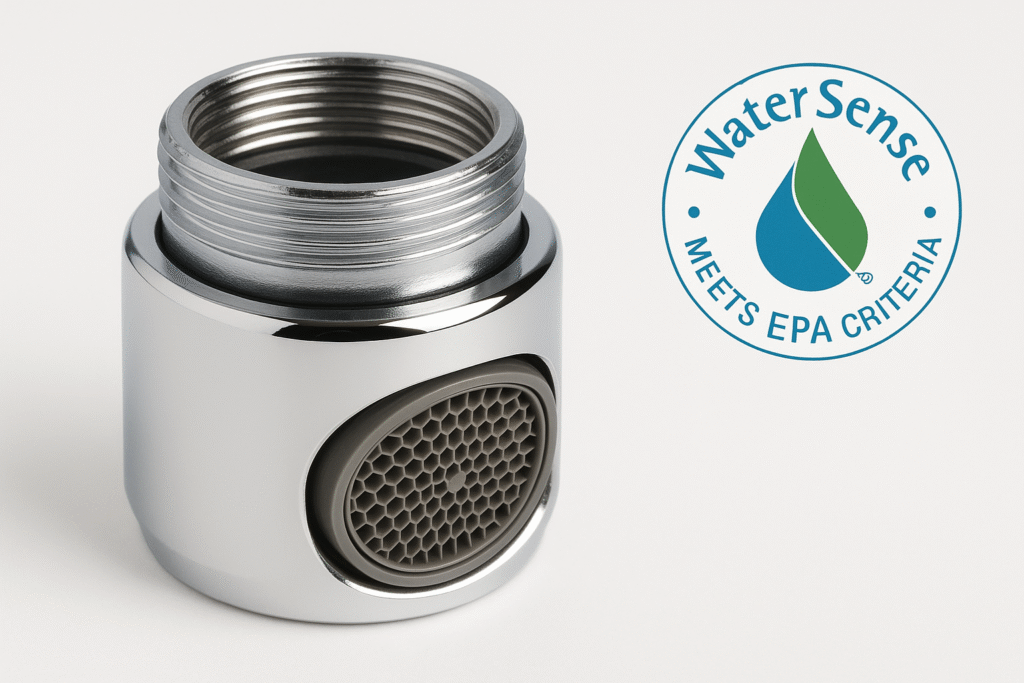
- Install the new one: Screw the new aerator onto the faucet, turning counter-clockwise until snug. Do not overtighten.
- Check for leaks: Turn on the water to check for leaks and proper flow.
“Faucet aerators are one of the simplest and most overlooked ways to solve water and energy waste problems,” states a representative from WaterSense, a partnership program sponsored by the U.S. Environmental Protection Agency (EPA).
Hygiene & Recommendation Block
- Safety: None specific to aerator installation.
- Best Practices: Clean aerators periodically to remove mineral deposits that can reduce flow. Consider different GPM (gallons per minute) rates for different uses: higher for kitchens, lower for bathrooms.
- Warnings: Ensure the aerator is properly threaded to prevent leaks.
12. Lower Hot Water Usage with Low-Flow Showerheads: Simple Shower Savings
Problem & Why This Helps
Are your showers consuming too much hot water, leading to inflated water heating bills? This is a common energy drain problem. Similar to faucet aerators, low-flow showerheads are a DIY solution that reduces the amount of hot water used during showering without compromising water pressure or comfort. They deliver water at a lower flow rate (typically 2.0 GPM or less compared to standard 2.5 GPM or higher), directly cutting down on the energy needed to heat water and the water consumption itself. This can lead to substantial energy savings on both water and utility bills.
How to Take Action (Step-by-Step DIY)
- Remove old shower head: Use a wrench or pliers (with a cloth to protect the finish) to unscrew the old shower head from the shower arm, turning counter-clockwise.
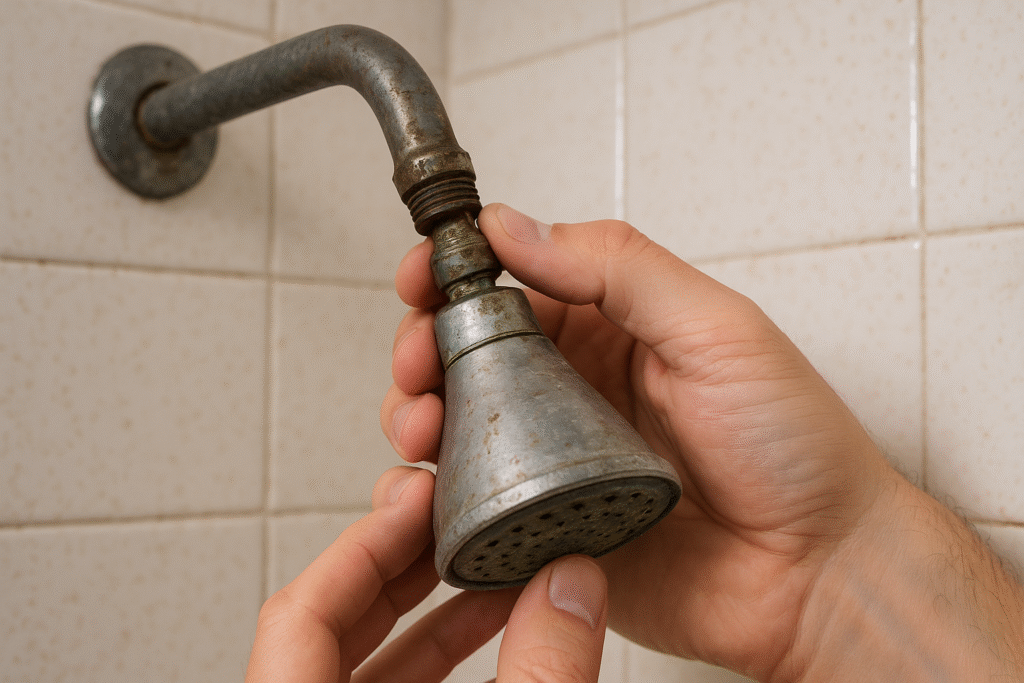
- Prepare the threads: Clean any old plumber’s tape or residue from the shower arm threads.
- Apply new tape: Apply new plumber’s tape (Teflon tape) clockwise around the threads of the shower arm to ensure a watertight seal.

- Install the new showerhead: Screw the new low-flow showerhead onto the shower arm, turning clockwise by hand until it’s snug. Avoid over tightening.
- Check for leaks: Turn on the water and check for leaks.
According to ENERGY STAR, switching to an EPA WaterSense labeled showerhead can solve significant water waste problems, saving a typical family about 2,700 gallons of water per year and enough electricity to power a television for a year.
Hygiene & Recommendation Block
- Safety: Avoid standing directly under the shower arm when unscrewing the old showerhead, in case it drops.
- Best Practices: Choose a WaterSense labeled showerhead for guaranteed efficiency and performance. There are various spray patterns available, so you can find one that suits your preference.
- Warnings: Do not overtighten the new showerhead, as this can damage the threads on the shower arm.
13. Prevent Heat Escape by Closing Fireplace Dampers: Your Free Solution
Problem & Why This Helps
Is your fireplace creating a massive draft when not in use, essentially acting as a hole in your roof and wasting expensive heated or cooled air? This problem of an open fireplace damper is a common source of energy loss. Closing the damper when the fireplace is not in use acts as a simple, free DIY way to prevent substantial energy loss and improve your home’s energy efficiency. This is a crucial draft-proofing step that directly solves the problem of unwanted air exchange.
How to Take Action (Step-by-Step DIY)
- Locate the damper: Locate the damper handle or lever inside your fireplace. It’s usually a metal handle that slides or rotates to open and close a metal plate inside the chimney.

- Ensure safety first: After ensuring there are no embers or hot ashes present and the fire is completely out and cold, move the handle to close the damper. It should create a tight seal.

- Consider upgrades (if needed): If your damper doesn’t seal well, consider a temporary chimney balloon or top-sealing damper for better effectiveness in stopping air leaks.
The U.S. Department of Energy states that a traditional fireplace with an open damper can exhaust as much as 8,000 cubic feet of heated air per hour to the outside, representing a significant energy waste problem.
Hygiene & Recommendation Block
- Safety: Crucially, never close the damper while a fire is burning or embers are hot. This can lead to dangerous smoke and carbon monoxide buildup in your home. Ensure the firebox is completely cool to the touch.
- Best Practices: Routinely check that your damper is fully closed when the fireplace isn’t in use. If your damper doesn’t seal well, look into a top-sealing damper or a chimney balloon for a more effective airtight seal.
- Warnings: If you smell smoke indoors or your carbon monoxide detector goes off after closing the damper, immediately open it and ventilate your home.
14. End Phantom Power Waste with Smart Power Strips: Automated Energy Savings
Problem & Why This Helps
Are your electronics drawing power even when turned off, quietly increasing your electricity bill through “phantom load” or “vampire power”? This invisible energy waste problem can add up significantly. Smart power strips (or advanced power strips) offer a simple DIY solution that automatically cuts power to devices that are turned off or go into standby mode. This can significantly reduce your electricity bill without requiring you to unplug everything manually, offering an easy path to more energy savings.
How to Take Action (Step-by-Step DIY)
- Identify culprits: Identify electronics that are often left plugged in but not actively used (e.g., TV, gaming console, computer peripherals, chargers).
- Plug in the solution: Plug these devices into a smart power strip. Some smart strips have “master” outlets; when the device in the master outlet is off, dependent devices in other outlets are powered down.
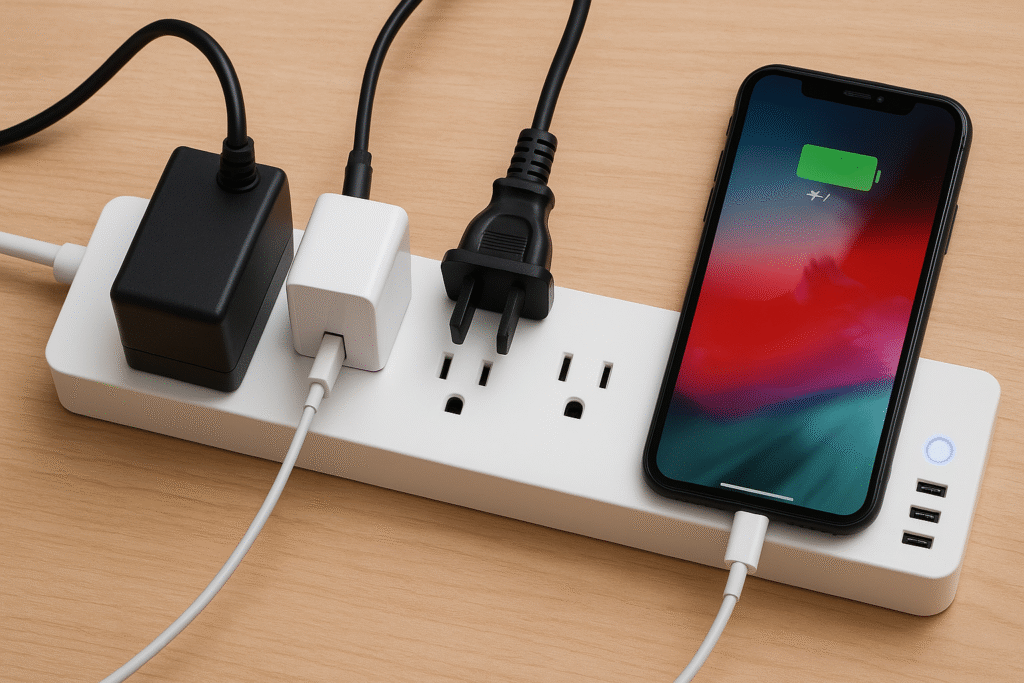
- Set it and forget it: Program the smart strip according to its instructions, or simply let it do its job if it’s an “always on” or “master-controlled” type.
According to the Lawrence Berkeley National Laboratory, standby power accounts for 5-10% of residential electricity use in the average U.S. home, highlighting the potential for solving energy waste problems with smart power strips.
Hygiene & Recommendation Block
- Safety: Ensure the smart power strip has surge protection to protect your electronics. Do not overload the power strip beyond its rated capacity.
- Best Practices: Prioritize smart strips for entertainment centers and home offices where multiple devices are often in standby mode.
- Warnings: Some devices (e.g., DVRs that need to record medical equipment) should not be plugged into smart power strips that cut off power completely, as it might disrupt their function.
15. Optimize HVAC Performance by Adjusting Thermostat Settings Seasonally: Your Smart Strategy
Problem & Why This Helps
Are your thermostat settings contributing to unnecessarily high heating and cooling bills? This problem often stems from setting temperatures too high in winter or too low in summer, forcing your HVAC system to overwork. This is perhaps the simplest and most impactful low-tech DIY upgrade: consciously adjusting your thermostat settings based on the season and occupancy. Even a few degrees can make a significant difference in your energy consumption, directly solving the problem of energy overspend and optimizing HVAC performance.
How to Take Action (Step-by-Step DIY)
- Winter Strategy: Set your thermostat to 68∘F (20∘C) during the day when you are awake and active. Lower it by 7-10°F (4−6∘C) when you are asleep or away from home to save heating costs.
- Summer Strategy: Set your thermostat to 78∘F (26∘C) when you are home. Raise it by 7-10°F (4−6∘C) when you are away to save on cooling costs.

- Dress for comfort: Wear appropriate clothing (layers in winter, lighter clothes in summer) to remain comfortable at these settings, complementing your energy-efficient strategy.
The U.S. Department of Energy states that you can solve up to 10% of your heating and cooling bill problem a year by simply turning your thermostat back 7∘−10∘F (4∘−6∘C) for 8 hours a day from its normal setting, a proven energy-saving tip.
Hygiene & Recommendation Block
- Safety: No safety risks associated with this.
- Best Practices: Consistency is key. Make it a habit to adjust your thermostat. If you often forget, consider a programmable or smart thermostat for automation and even greater energy efficiency.
- Warnings: Avoid extreme temperature swings, as this can sometimes cause your HVAC system to work harder to recover. Gradual adjustments are best.
16. Warm Up Cold Zones with Rugs or Floor Mats: Instantly Boost Comfort
Problem & Why This Helps
Do your floors constantly feel cold, making your home uncomfortable and tempting you to turn up the heat unnecessarily? This common problem of heat loss through floors can be easily solved. Rugs and floor mats provide an additional layer of insulation on cold floors, particularly in homes with uninsulated crawl spaces, basements, or those with tile, concrete, or hardwood flooring. They help to prevent heat loss through the floor and make a room feel warmer, instantly boosting comfort and indirectly contributing to energy savings.
How to Take Action (Step-by-Step DIY)
- Identify problem areas: Identify areas in your home where floors constantly feel cold (e.g., living rooms, bedrooms, near exterior doors).
- Choose the right solution: Select rugs or mats with a dense pile or an insulating backing. Larger rugs will provide more coverage and insulation.
- Place for comfort: Place the rugs or mats in the identified cold zones. Ensure they lie flat to prevent tripping hazards.
- Maximize insulation: For maximum benefit, consider layering rugs or using an insulating rug pad underneath.

Building science research indicates that adding thermal mass, such as rugs, to floor surfaces can improve perceived thermal comfort and reduce radiant heat loss from occupants, contributing to a more energy-efficient home.
Hygiene & Recommendation Block
- Safety: Ensure rugs have non-slip backings or use rug grippers to prevent tripping.
- Best Practices: Clean rugs regularly to maintain indoor air quality. In summer, you can remove heavier rugs if you prefer a cooler feel.
- Warnings: Be mindful of pets or children who might slip or chew on rugs.
FAQ: Your Questions on Solving Energy Problems Answered
Q: Are these upgrades acceptable in rental units without violating lease terms? A: Yes—every recommended DIY home upgrade is temporary and fully reversible, making them landlord-friendly and ideal for rental energy savings.
Q: How much can I realistically save on my energy bills? A: Energy efficiency gains typically range from 10% to 30%, depending on your home’s draftiness, insulation status, and climate. Consistent application of these energy-saving tips yields the best results.
Q: Do I need specialized tools for these DIY home improvements? A: Only basic tools like caulk guns, scissors, or screwdrivers are needed. No power tools or building permits are required for these simple home upgrades—you can do them yourself!
Q: When will I notice the results in my energy consumption? A: After completing the home upgrade, the next utility bill cycle (1–2 months) usually begins to show lower energy usage and real energy cost savings.
Q: Are there any safety risks to follow with these DIY energy-saving projects? A: Minor precautions—like avoiding skin contact with caulk, ventilating during application, and monitoring heated equipment—make these projects very safe when done carefully. Always prioritize safety for your home improvements.
Final Tips & Call to Action: Start Your Energy-Saving Journey Today
Ready to solve your energy problems and boost your home comfort? Take action now! Start small: pick one room or zone, seal drafts, install curtains, swap showerheads, and track your next utility bill. You’ll likely feel and see the difference fast.
Ready to go deeper into home energy efficiency? Visit our DIY Energy Savings Hub for full tutorials, product comparisons, and printable checklists to expand your savings game and make your home truly energy-efficient.
https://www.energystar.gov/saveathome/seal_insulate/do-it-yourself-guide
Disclaimer
Please note that the information provided in this blog post, “15 DIY Home Upgrades: Cut Energy Bills & Boost Home Comfort,” is intended for general informational and educational purposes only. While we strive to offer accurate and helpful advice, these DIY projects are undertaken at your own risk.
It’s crucial to exercise caution and common sense when performing any home improvement task. Always follow manufacturer instructions for any products you use. If you are unsure about any step or feel uncomfortable performing a task, it’s highly recommended to consult with a qualified professional. This is especially true for tasks involving electricity, plumbing, or structural changes.
We are not liable for any injuries, damages, or losses that may result from the use or misuse of the information presented here. Individual results regarding energy savings and comfort improvements may vary significantly based on your home’s specific condition, climate, existing energy efficiency, and the quality of your work.
Always prioritize safety and, if in doubt, seek expert guidance.
Author

Kalyan Nagasamudram