The Ultimate Guide to Raised Bed Gardening for Small Yards
Do you dream of fresh, homegrown vegetables and herbs but feel limited by a tiny backyard, a small patio, or even just a concrete slab? You’re not alone! Many aspiring gardeners face the challenge of limited space. But what if we told you that with the right approach, you could transform even the most modest outdoor area into a productive, thriving garden? This ultimate guide to raised bed gardening for small yards will show you how.
This comprehensive guide will walk you through every step of creating a successful raised bed gardening for small yards setup, from planning and construction to planting and ongoing maintenance. Get ready to cultivate a lush, low-maintenance oasis and enjoy the freshest produce right outside your door!

Raised Bed Gardening for Small Yards
Why Raised Beds Are Perfect for Small Yards: The Smart Solution
Raised beds are essentially elevated garden plots, typically framed by wood, metal, composite materials, or even recycled elements. In tight urban lots, compact backyards, or even on paved surfaces, they offer an unparalleled return on square footage. They concentrate fertility, warmth, and water in a compact, manageable footprint, making them ideal for intensive gardening.
Raised beds are essentially elevated garden plots, typically framed by wood, metal, composite materials, or even recycled elements. In tight urban lots, compact backyards, or even on paved surfaces, they offer an unparalleled return on square footage. They concentrate fertility, warmth, and water in a compact, manageable footprint, making them ideal for intensive gardening and specifically, raised bed gardening for small yards.
Here’s why raised beds are a game-changer for gardeners with limited space:
- Maximized Productivity: Raised beds allow for closer plant spacing, often referred to as “intensive planting.” This means you can grow significantly more food in the same area compared to traditional row gardening. Some studies, like those from the University of Georgia Cooperative Extension, suggest raised beds can produce up to four times more vegetables!
- Superior Soil Control: One of the biggest advantages is complete control over your soil. You can create the ideal soil blend, ensuring perfect drainage, aeration, and nutrient availability from day one. This bypasses common issues like compacted native soil, poor drainage, or nutrient deficiencies often found in small, established yards.
- Improved Drainage & Aeration: Elevated beds naturally drain excess water, preventing waterlogging that can suffocate roots. The contained soil also remains looser and more aerated, fostering robust root development and healthier plants.
- Extended Growing Season: The soil in raised beds warms up faster in spring and retains warmth longer into fall compared to in-ground gardens. This allows you to plant earlier and extend your harvest season.
- Reduced Weeds and Pests: The contained nature of raised beds, combined with quality soil and potentially a weed barrier, significantly reduces weed pressure. The elevated height can also deter some crawling pests like slugs and snails, making pest management easier.
- Ergonomic Gardening: For those with back pain or mobility issues, raised beds reduce the need for bending and kneeling, making gardening a more comfortable and enjoyable activity.
- Aesthetic Appeal: Raised beds can be beautiful landscape features, adding structure and visual interest to your small yard or patio. They offer a neat and organized look, even when bursting with plants.
Designing Your Small Raised Bed Garden: Plan for Success in Limited Areas
Before you grab a shovel or a drill, careful planning is essential. This stage sets the foundation for a productive and enjoyable raised bed gardening for small yards experience.
1. Plan the Size and Location: Measure Twice, Grow Once
Proper sizing of your raised bed is critical for both comfort and crop access. Beds wider than four feet can be difficult to reach into without stepping on the soil, which compacts it and hinders root growth. For small spaces, accessibility from all sides or at least one long side is key.

How to Plan Size and Location:
- Use a measuring tape to define the maximum area available. Consider common and efficient dimensions like 2×6 feet or 4×4 feet. For paved areas, modular beds offer excellent flexibility.
- “When I built my first 3×6 cedar bed on my condo patio, I realized the width allowed me to weed and harvest without stretching awkwardly, making daily care a breeze.”
Key Considerations:
- Safety Verdict: No hazards, but ensure enough room around the bed for comfortable mobility and watering.
- Best Practices: Aim for 2–3 feet of walking space around each bed if possible.
- Warnings: Avoid placing beds too close to fences or structures that will cast dense shade throughout the day.
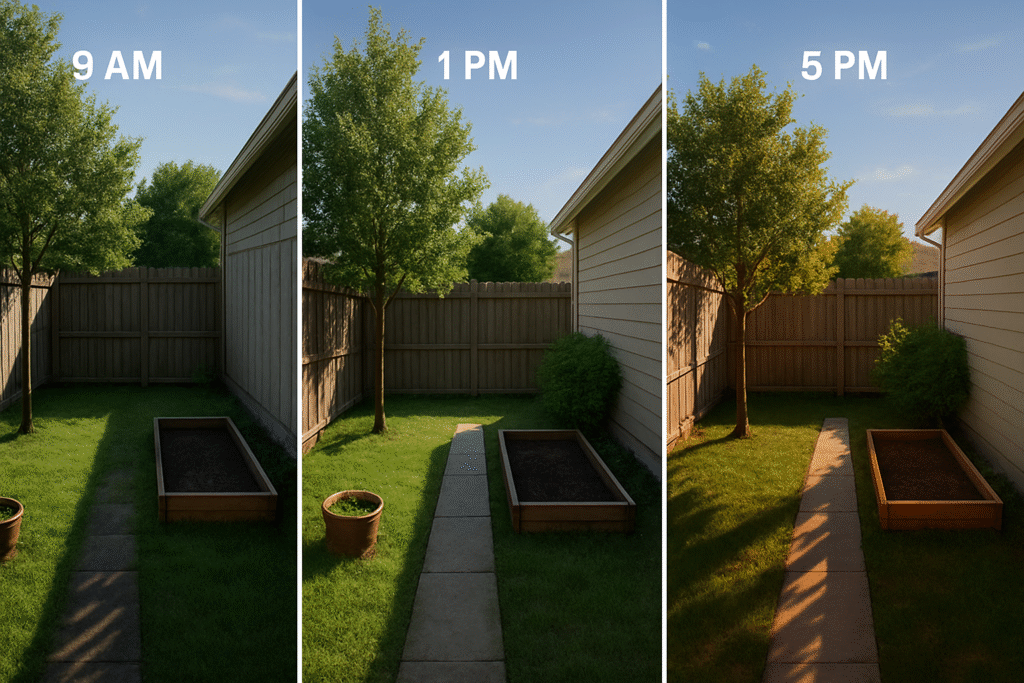
2. Ensure Adequate Sunlight: The Golden Rule of Gardening
Most fruiting vegetables (like tomatoes, peppers, squash) and many leafy greens require a minimum of 6–8 hours of direct sunlight per day for optimal growth and yield. Inadequate sun leads to weak, leggy growth and poor harvests.
How to Ensure Adequate Sunlight:
- Use a sun calculator app or, even better, observe shadows in your chosen spot at different times of the day for a few days to identify the sunniest area.
- “Cornell University suggests tracking sunlight over a few days during your chosen growing season for the most accurate read, as sun angles shift throughout the year.”
Key Considerations:
- Safety Verdict: Essential for crop success and plant health.
- Best Practices: Orient rectangular beds in a north-south direction for more even light distribution.
- Warnings: Be mindful of seasonal changes—the sun’s angle changes significantly from spring to summer and fall. What looks sunny in spring might be shady in mid-summer.
3. Optimize for Access and Convenience: Keep it Close
Placing your raised beds near your kitchen or back door significantly encourages regular care and harvesting. Gardens that are far out of sight tend to be neglected, leading to lower yields and higher maintenance.

How to Optimize for Access and Convenience:
- Choose a location that is within easy reach of a hose or a convenient watering can filling station.
- Consider proximity to daily foot traffic, making it easy to spot and address any plant needs.
- “Studies in urban agriculture have consistently shown that garden proximity to the home increases harvest rates and reduces plant stress from drought, simply because gardeners tend to visit them more often.”
Key Considerations:
- Safety Verdict: Safe and ergonomic for the gardener.
- Best Practices: Position beds on level ground to ensure even water distribution and prevent runoff.
- Warnings: Avoid setting beds where pets or children frequently play, especially if you plan to install delicate plants or trellises.
Building Your Thriving Foundation: From Frame to Soil
Once your plan is set, it’s time to bring your raised bed to life.
1. Build or Buy a Raised Bed: Your Choice of Construction
You have two main options for acquiring your raised bed structure: DIY or prefabricated kits.
DIY Construction
Building your own raised bed is often the most cost-effective solution and allows for complete customization to fit your exact space and aesthetic. Materials like cedar and redwood are naturally rot-resistant and free from harmful chemicals, making them excellent choices for food gardens.

How to DIY Construct:
- Purchase untreated, rot-resistant lumber (2×6 or 2×8 planks are common for height).
- Cut the planks to your desired lengths and screw them together into a rectangular or square frame.
- Reinforce corners with additional wood blocks or metal brackets for stability.
- “The University of Maryland Extension confirms that untreated cedar can last 10–15 years outdoors, providing a durable and food-safe option for your garden.”
Key Considerations:
- Safety Verdict: Safe when using untreated wood. Always wear gloves and eye protection when cutting or handling lumber.
- Best Practices: Drill pilot holes before screwing to prevent wood splitting.
- Warnings: Crucially, avoid pressure-treated wood unless it is explicitly certified as safe for food gardens (e.g., ACQ-treated lumber), as older formulations contained arsenic.
Use a Prefabricated Kit
Prefabricated kits are ideal for those who prefer a quick, easy assembly process or are renting and need a less permanent solution. Many kits are made from durable materials like composite, recycled plastic, or galvanized metal.

How to Use a Prefabricated Kit:
- Choose a kit with a minimum depth of 10–12 inches (deeper is often better for root crops).
- Follow the manufacturer’s instructions for assembly, typically on a flat, level surface.
- “Renowned product review sites like Wirecutter often recommend brands like Birdies Raised Beds for their durability and straightforward assembly, making them a popular choice for beginners.”
Key Considerations:
- Safety Verdict: Generally safe and efficient to assemble.
- Best Practices: Anchor frames with ground stakes, especially if on soft ground, to prevent shifting.
- Warnings: Some shallower kits may not provide sufficient depth for root vegetables like carrots or potatoes; check product specifications carefully.
2. Install a Weed Barrier: A Foundation for Freedom
A properly installed weed barrier is crucial for preventing perennial weeds and stubborn grass from growing up into your raised bed, saving you countless hours of weeding later.
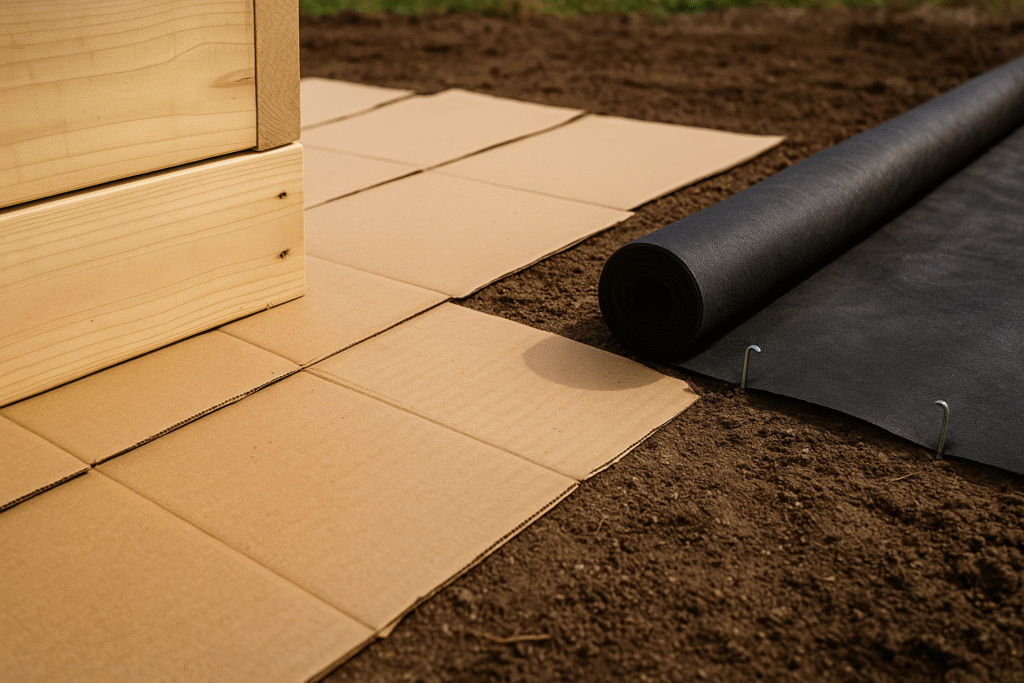
How to Install a Weed Barrier:
- Lay down a breathable landscape fabric or several layers of plain, uncoated cardboard directly on the ground (or concrete) where your raised bed will sit.
- Overlap the edges of the fabric or cardboard to ensure no gaps.
- Wet cardboard thoroughly to help it settle and begin breaking down.
- Place your raised bed frame on top of the barrier before adding soil.
- “According to the USDA, cardboard acts as a biodegradable mulch, not only suppressing weeds but also improving soil structure and attracting beneficial earthworms as it decomposes over time.”
Key Considerations:
- Safety Verdict: Safe and environmentally friendly, especially with cardboard.
- Best Practices: Use uncoated, ink-free cardboard (avoid glossy or heavily printed cardboard).
- Warnings: Do not use impermeable plastic sheeting as a barrier—it will impede drainage and suffocate beneficial soil organisms.
3. Fill with High-Quality Soil Mix: The Heart of Your Garden
The soil is the foundation of plant health, and in a raised bed, you have the unique opportunity to create the perfect growing medium. A high-quality soil mix ensures excellent drainage, proper aeration, and abundant nutrient availability from the start.

How to Fill with High-Quality Soil Mix:
- A popular and effective blend is 50% screened topsoil, 25% high-quality compost, and 25% organic matterlike coconut coir (coco coir) or coarse vermiculite/perlite. Compost provides essential nutrients and beneficial microbes, while coco coir or vermiculite improve water retention and aeration.
- Mix these components thoroughly in a wheelbarrow or on a tarp before filling your bed.
- Fill the raised bed nearly to the top, leaving an inch or two of space from the rim.
- After planting, apply a 1–2 inch layer of organic mulch (like straw, shredded leaves, or wood chips) to the soil surface to retain moisture, regulate soil temperature, and further suppress weeds.
- “The National Gardening Association frequently recommends variations of the ‘Mel’s Mix’ formula, similar to this 50-25-25 ratio, for its proven success in intensive, small-space gardening.”
Key Considerations:
- Safety Verdict: Safe when using clean, uncontaminated materials. Source soil and compost from reputable suppliers.
- Best Practices: Consider performing a soil pH test (ideal range: 6.0–7.0 for most vegetables) and amend as needed with lime (to raise pH) or sulfur (to lower pH).
- Warnings: Avoid using unamended soil directly from your yard unless it’s been tested for contaminants or heavy weed seeds. It can introduce problems rather than solve them.
Cultivating Success: Planting, Watering & Harvesting
With your raised bed built and filled, it’s time for the exciting part—planting!
1. Plan a Square-Foot Layout: Maximize Every Inch
Square-foot gardening is a highly effective method for maximizing production in tight spaces. It divides your raised bed into a grid of 1×1 foot planting areas, with each square customized for specific crop spacing. This method reduces crowding, optimizes airflow, and significantly boosts yield.
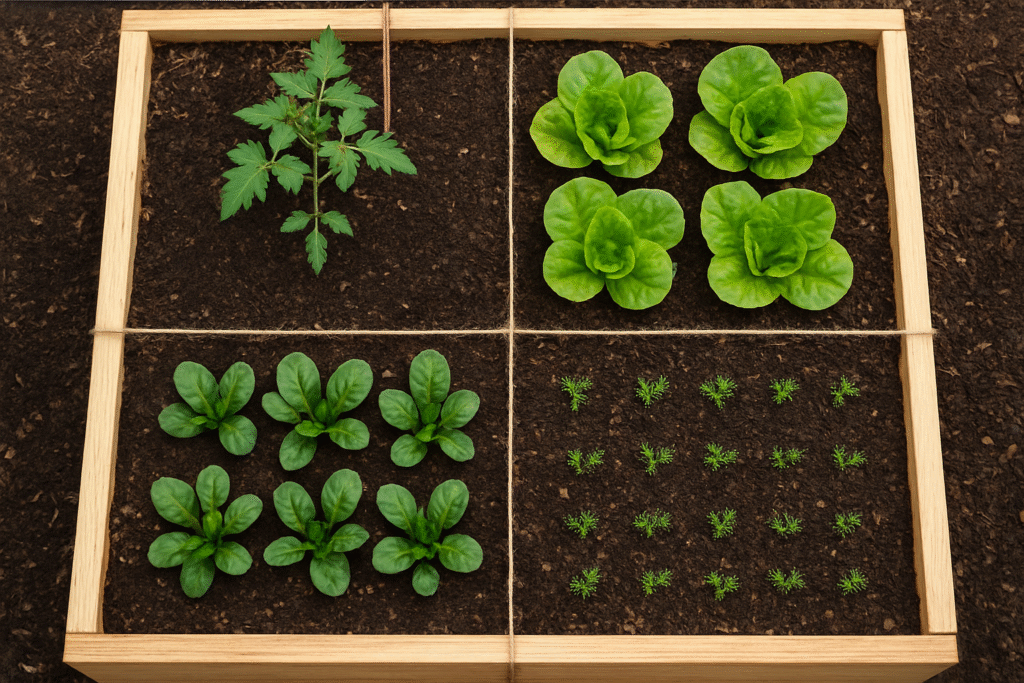
How to Plan a Square-Foot Layout:
- Use string, thin wooden strips, or a permanent lattice to create a visible 1-foot grid across the top of your raised bed.
- Refer to square-foot gardening spacing guidelines: for example, 1 tomato plant per square, 4 lettuces per square, 9 spinach plants, or 16 carrots per square.
- Install trellises, cages, or stakes on the north side of your bed for climbing crops (like cucumbers, pole beans, or vining tomatoes) to allow them to grow vertically without shading out other plants.
- “Developed by Mel Bartholomew, the original square-foot gardening method revolutionized urban agriculture and is backed by decades of successful implementation for efficient small-space food production.”
Key Considerations:
- Safety Verdict: Safe and incredibly space-efficient.
- Best Practices: Rotate crops between squares each season to avoid nutrient depletion and reduce the build-up of soil-borne pests and diseases.
- Warnings: Be diligent about monitoring soil moisture; densely planted beds can dry out faster than traditional gardens.
2. Choose Beginner-Friendly Crops: Start with Success
Starting with fast-growing, resilient, and compact crops builds confidence and ensures early success, encouraging you to continue your gardening journey. These plants are also well-suited to the confined space of raised beds.

Beginner-Friendly Crop Examples:
- Leafy greens: Lettuce, spinach, kale, Swiss chard. Many can be “cut and come again” for continuous harvests.
- Herbs: Basil, cilantro, parsley, mint, chives. These are perfect for quick kitchen access.
- Root crops: Radishes, carrots (choose shorter, wider varieties for shallower beds), beets.
- Compact fruits/vegetables: Bush beans (not vining), cherry tomatoes (determinate varieties or those suitable for containers), compact bell peppers.
- “According to a 2022 gardening trends report by the National Gardening Association, leafy greens and herbs consistently rank as the most popular and successful crops among new raised bed gardeners.”
Key Considerations:
- Safety Verdict: Safe and promotes a positive beginner experience.
- Best Practices: Stagger plantings every 1-2 weeks for certain crops (like lettuce or radishes) to ensure a continuous harvest rather than a single large yield.
- Warnings: Avoid large, aggressive vining crops (like pumpkins or large squash) unless you have substantial vertical trellising and are prepared for their expansive growth.
3. Watering and Maintenance Tips: Consistency is Key
Raised beds tend to dry out faster than in-ground gardens due to increased air circulation and sun exposure. Consistent watering and diligent weeding are paramount to healthy, productive crops.

Watering & Maintenance Tips:
- Watering: Water deeply and thoroughly in the morning, aiming at the base of the plants to reduce leaf wetness, which can encourage fungal diseases. Use a soaker hose or drip irrigation system for maximum efficiency and water conservation. If hand watering, use a gentle stream to avoid disturbing the soil.
- Mulching: Apply a 1–2 inch layer of organic mulch (straw, shredded leaves, wood chips) after planting. This conserves soil moisture, suppresses weeds, and moderates soil temperature.
- Weeding: Regularly remove any weeds that emerge. In a raised bed, weeding is typically much easier due to the loose, high-quality soil.
- Fertilizing: As plants grow and draw nutrients from the soil, you may need to replenish. Incorporate compost throughout the season or use a balanced organic liquid fertilizer as needed.
- “The EPA reports that precisely targeted drip irrigation systems can reduce water usage by up to 60% compared to overhead watering, making them an excellent choice for raised beds.”
Key Considerations:
- Safety Verdict: Safe and essential for plant vitality.
- Best Practices: Check soil moisture daily, especially during hot or windy weather, by sticking your finger an inch or two into the soil. Water if it feels dry.
- Warnings: Avoid overhead watering, especially in the evening, as prolonged leaf wetness encourages fungal diseases.
4. Harvest and Replant: The Cycle of Abundance
Timely harvesting not only provides you with fresh produce but also encourages plants to produce more. Practicing “succession planting” (replanting harvested areas) extends your growing season and maximizes your yield from limited space.

How to Harvest and Replant:
- Leafy Greens: Pick outer leaves when they reach usable size. This allows the inner leaves to continue growing.
- Root Crops: Harvest when the tops are mature and the soil around the root crown begins to crack.
- Bush Beans/Peppers/Tomatoes: Pick regularly to encourage continuous fruit set.
- After removing old plants or harvesting an entire square, amend that square with fresh compost and re-seed or transplant new crops.
- “A University of California study on leafy greens found that frequent, consistent harvesting significantly increases total biomass production over the entire growing season.”
Key Considerations:
- Safety Verdict: Safe and boosts productivity.
- Best Practices: Keep a simple garden journal to track planting dates, harvest dates, and notes on what worked well (or didn’t).
- Warnings: Don’t leave overgrown or diseased plants in your beds; remove them promptly to prevent pest and disease issues.
FAQs: Quick Answers for Common Queries
Q1: Can I put a raised bed on concrete or a patio? A1: Yes, absolutely! Raised beds are excellent for concrete. Ensure your bed is at least 12 inches deep for most vegetables and add a layer of gravel or non-plastic landscape fabric underneath for drainage if you want extra assurance.
Q2: How long does it take to build a raised bed garden? A2: A prefabricated kit can often be assembled in less than 2 hours. A DIY build, including sourcing materials and construction, may take a weekend, depending on your skill level.
Q3: Are raised beds expensive to maintain? A3: Not at all. Once the initial investment in materials and soil is made, the primary recurring costs are seeds, seedlings, and replenishing compost. The efficiency often leads to cost savings on produce.
Q4: How do I keep pests out of raised beds? A4: Raised beds offer some natural deterrence. You can further protect your crops by using floating row covers, planting pest-deterring companion plants (like marigolds), installing copper tape around the perimeter for slugs, and regularly inspecting your plants for early signs of pests.
Q5: How deep should a raised bed be for vegetables? A5: A minimum depth of 10-12 inches is generally sufficient for most vegetables. However, 18-24 inches is ideal for root vegetables like carrots, potatoes, and allowing for greater root development and moisture retention.
Call to Action
Ready to transform your small yard into a bountiful raised bed garden? The journey begins today! Measure your space, sketch a layout, and select your first beginner-friendly crops.

Then, come back and share your success, challenges, and any tips you discover with our growing community. We can’t wait to see what you grow!
https://www.gardenary.com/blog/the-complete-guide-to-raised-beds